Week 32- Wrapped and painted stick
For the 3rd week running this is another craft I have done as a main post so next week I WILL do something exclusively for this page- something different.

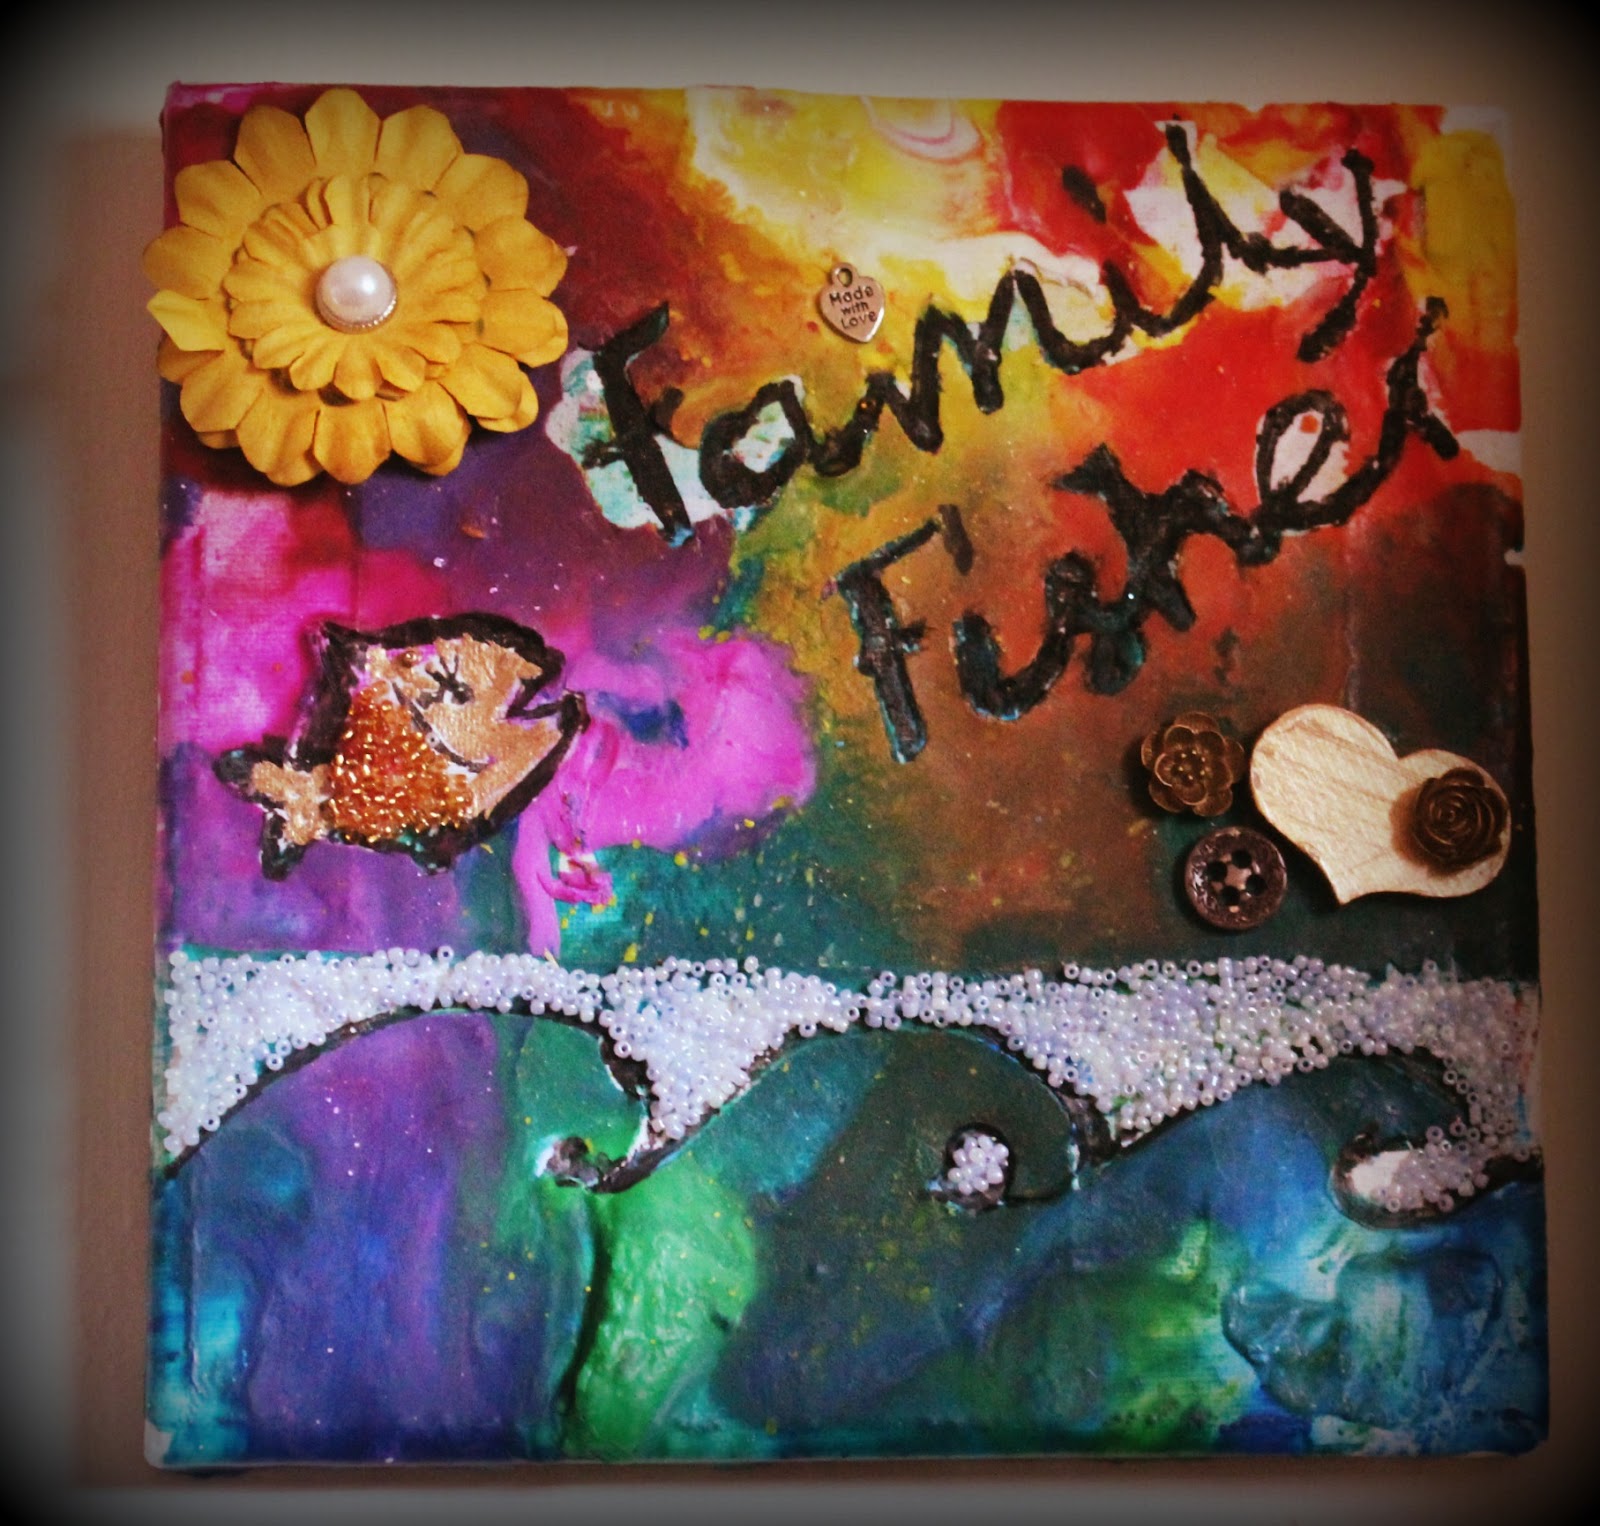
Week 31- melted crayon art
Another new craft I hadn't tried before but also one I had already covered on my main page.
Week 30 (after a 1 year break)
I did a main post about this but wanted to include it in here as it was a 1st; my multi media mobile.

Wk 29 Advent Calendar
My first proper shopping experience on my own since I injured my back introduced me to Wilko's new range of Christmas crafty stationary. I deliberated for quite a while over what to buy- which range and then what items from that range and how much was acceptable etc. I decided on the red and grey as I knew I had other papers at home which would co-ordinate.


I've had the paper for years and only used a few pieces in case I messed up but I decided to get stuck in with the new stock before I changed my mind and left it with the other pretty paper to merely look at every now and again. I looked through lots of my craft books and found an advent calendar idea in felt which I thought I could adapt. This was from the Mollie Makes Christmas book.

I decided (foolishly) to do 24 envelopes rather than simply the 12 days and thus it was quite a long challenge.


Taking the sheet and folding in 2, I then cut it in half. I folded one of these into 2 which makes the main pocket. Using the pretty cello-tape, I stuck the 2 sides together leaving a big enough gap for a chocolate coin.


In the old pack of paper, I found 2 sheets of this number paper and cut out lots of numbers in addition to some from the other papers. Mixing the sizes and positions, I felt that it gave the overall look a more handmade and unique feel.

I need to now buy a board to mount them onto which will be strong enough to hold each envelope with a chocolate coin in.
Some other ideas I plan to use the paper for are below and are taken from various books and magazines.


Wk 28 Big shot baubles
During the unpacking of boxes and binning of lots of our things, I emptied paper wallets of old documents. I really liked the strong colours and decided to use the card for something and then along came the big shot!

I did a few tests first to see if the dies would cut through the thick card and they all did without trouble. I began by cutting lots of shapes in lots of colours which took a while as I was trying to make best use of the card without wasting and using the same die for a while and then swapping to the others which then required different levels of the platform.

I was able to do all this with the girls nearby as the Big Shot is totally safe and even the youngest who is 3 is able to turn the handle. They each stole quite a few of the flowers and hearts though!

I then began layering them up and playing around with shapes and colours. By 3+ layers, they are very sturdy which is comforting as little hands do a mighty amount of squishing!
Once I had decided on the combinations I liked, I then had to do an overall shape. It may have been easier to do it first as then it would have been symmetrical but I cut out the shape I wanted after I had stuck the medallion pattern on to gauge the right shape etc.

The larger shapes aren't perfect and so I have convinced myself I need a bauble die which I think could then make these quite saleable. They're quite fiddly and time consuming but it is using up old card folders which would have otherwise been binned/ recycled. This way, the girls have helped me make something we can use this year in our new home. I'm not sure whether they will become a garland strung together, or individual tree decorations but they're colourful and different so I'm pleased either way!
Wk 27 Banana Cake- see main page
Wk 26 Zentangle Doodled Scrapbook
Wk 25 Raffle bits
I was asked to 'pretty up' some items for a friend who had organised a fundraiser. The items were a little obscure and posed a challenge as I didn't want to spend too much extra money on baskets and things to dress the pieces. I thought themed packages/ hampers would be the best approach and here are the results.


This is what was to go in the toiletry bags (not pictured here was also some moisturiser) which I decided to make out of a lovely off cut of Laura Ashley wipe clean fabric. From past experience, I know that it is hard to 'finish' the fabric neatly so I decided to make some Bias binding- this is a complete first. Not only making it, but using it on this fabric. I made up a very straight forward tote bag with additional 2" sides and bottom to create a box/ gift bag sized bag.

I began by drawing a line across the bias of my chosen cotton fabric and then cutting with pinking shears. I then drew another line in pencil making the strip 2" wide.


Then I folded one side over 1/2 " (1cm) and pressed with the iron. I repeated this on the other side to give me an 1" (2cm) strip of fabric with neat folded sides.

Opening out one of these folds, I then sewed it to the back/inside of the small square of the Laura Ashley box bag.

Thej, folding over the top of the tape, I then carefully sewed around the front side of the tape, which also sewed through the back of thhe tape with the wipe clean fabric in between the 2 tape layers.

I added a little button to finish with some green leather thong to loop as a clasp. A zip or conventional button hole would have been too tricky with this fabric.

But why make one, when I could make 2!

The other prizes included a friend hamper with 2 mugs, a fondue set and some hot chocolate sachets with biscuits/

A small wicker basket mini-hamper of candles, moisturiser, talc, soap and a loufer.

The last items were the most tricky as they were 6 ikea glasses, 3 of 2 designs but they were quite contrasting but after some deliberation, I decided not to separate them but dressed them up as best I could) in an old aftershave box with some tissue paper in co-coordinating colours.

Wk 24 Blackberry picking- coulis
Growing at the back of our new house are some blackberry bushes which I have been watching for a few days as they have just started to become ripe. I have fond memories of blackberry picking in Wales as a child but haven't done it since then. My eldest daughter has been wanting to pick them so I went online and found a simple recipe for Blackberry Coulis.


I washed and gently dried them and then left them overnight. We managed to pick roughly 250g but there was a spillage so I had to adjust the recipe I found on the BBC good food page:
250 g of blackberries (i had 200g)
50 g golden caster sugar (I did 40g caster sugar)
1/2 teaspoon of vanilla extract
100ml water

They were placed in small pot with the sugar poured over the top. Add the water and bring to the boil and then simmer for 5 mins. Add the vanilla extract and then allow to cool.

Place in a processor and blend until smooth. Then pour through a sieve using the back of a spoon to squeeze the moisture through- this took quite a while and I was cooking pancakes at the same time so it was a little awkward balancing the sieve over a jug etc. so next time I will do the coulis first! This amount of ingredients made just under 1/2 pint! so I have 1/4 left in my fridge which I'm planning to use in a Victoria sponge.

Very yummy breakfast for 5 with lots left to spare which felt much healthier than our usual golden syrup.
Wk 22 Gardening with kids

I have been wanting to make the most of our patio area and thought potted plants would be perfect for getting the kids involved too. I saw some lovely ideas on pinterest of making a fairy garden for children and felt inspired to have a go. I was looking after my niece so she joined in too. I will point out here that my 2 year old and 3 year old niece had limited patience with the sowing although my attention was divided between the 3 of them. My 4 year old, however, was very engaged and would have continued planting for longer. I tried to make things easier as I am new to this too, and went to Wilko for supplies. I spent approx £10 for 60+ seeds/bulbs, compost, feed and pots which I felt was very reasonable (although we'll see if they are worth it when they do/ don't grow!)
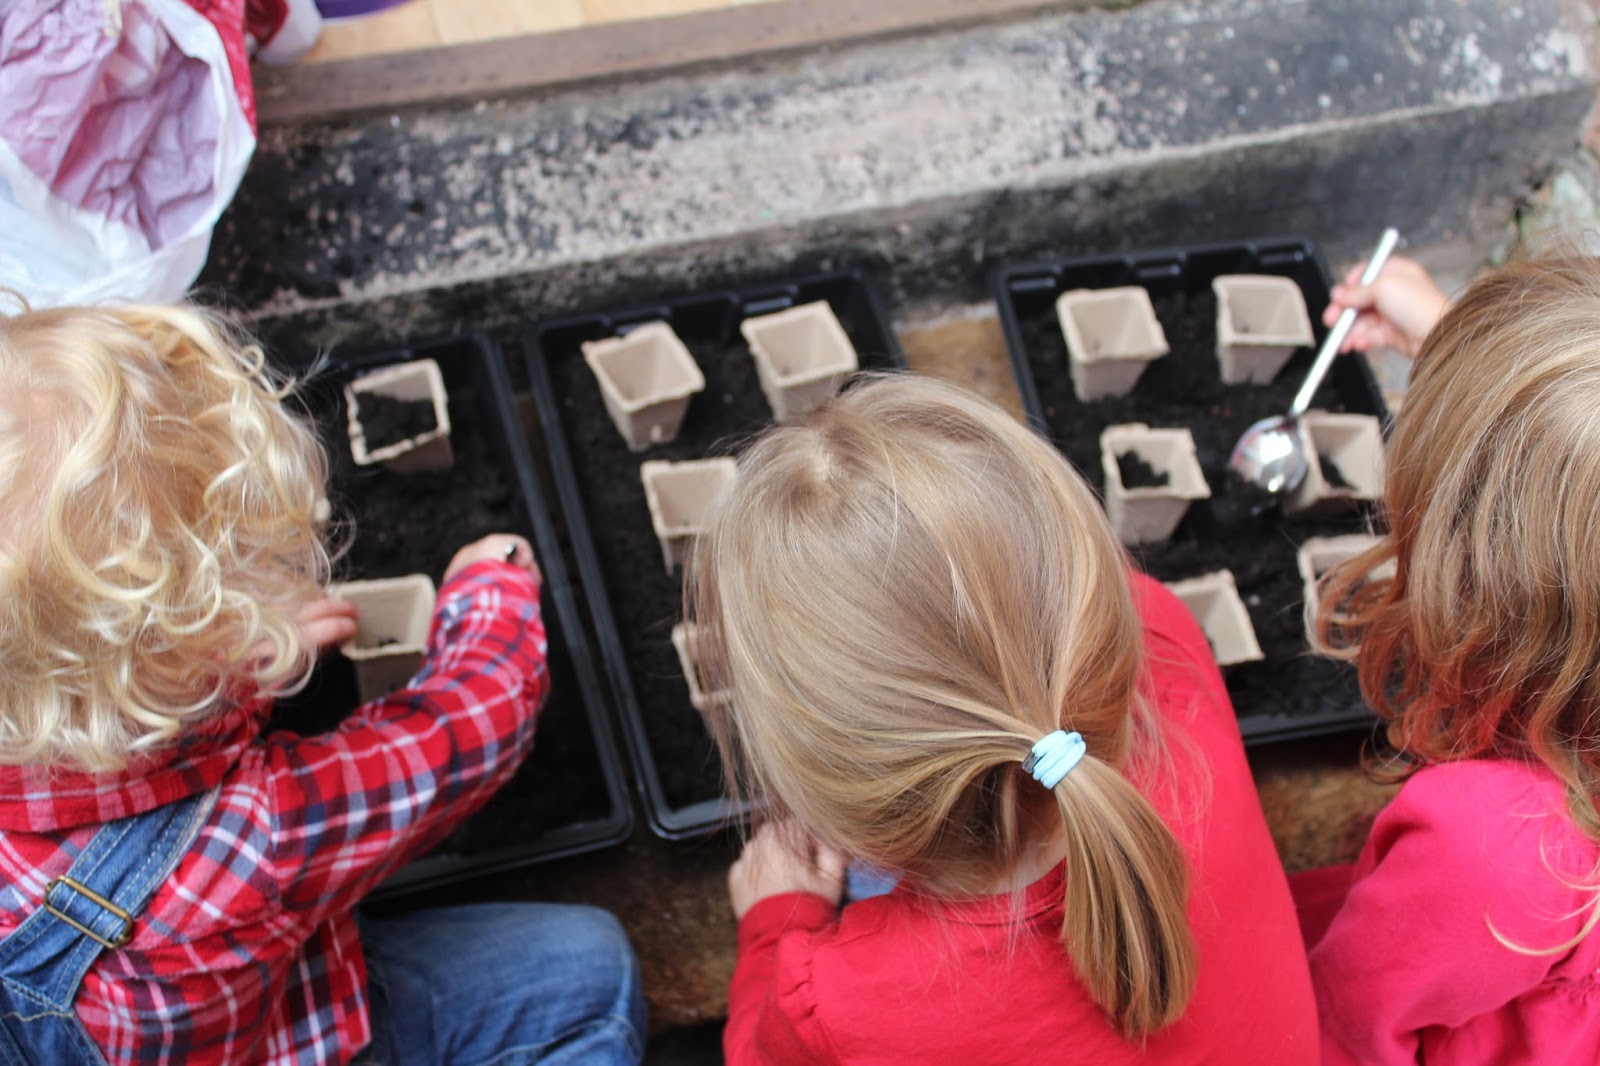
I gave each child a tray and then the biodegradable pots. Each pot had soil in which they filled themselves with spoons. They placed their seeds in and then recovered with soil. I wrote out the labels as my helpers were all too little to help here.

They had 6 small pots inside a tray which they filled with soil. I then gave them a tin of sea shells to decorate their trays and a large stone with their names written on to distinguish them from one another.

I had surplus shells which are great as they are waterproof and free. Most children love them and they can even be painted to add to the creativity. I am hoping to paint some gold to add some sparkle to the garden in the early days where there aren't any shoots.


Since motherhood trades in baby bottle for wine bottles, I have a forlorn wine rack which I was thinking of selling at the next carboot. But it caught my eye today and has now a new function. I will rotate the trays each time I water them and then they will each get a little sunlight but are raised up out of the way of pesky critters (those of you who know me, know that what I'm really avoiding are slugs!)

Wk 22 Draught Excluder
I'm going to try and keep the typing to a minimum this time-here goes:
1 pair of old jeans + stuffing + buttons & lace.

Take said pair of old jeans:


Cut off Leg as high as possible. Cut off scruffy edges.


Remove back pockets. Draw around a plate and cut around.

Right side to right side, sew circle to end of leg.


Repeat at other end leaving a gap to allow for stuffing.
Stuff the leg tightly pushing stuffing all the way down- the heavier, the better. This was 3 cushions worth of stuffing so it is weighty.


Hand sew the edge closed.
Add some embellishments to hopefully) disguise its origins.

Your completed draught excluder in anticipation of cold nights. It's not perfect but it's functional and efficient so not too shabby :D
Wk 21- Face Painting


Here is my eldest daughter; my first victim. I pinned her hair back and began with sponging her with a white face. We had looked at ideas on the internet and she had chosen a clown and then after an additional search, she liked the clown with rainbow eyes. I had the colours in the cheap set I had bought so thought I would attempt it. After using a foam pad to spread the white over all of her face, used a corner to make lines of the other colours and then used the foam to blend them a little. I used a brush to do the black lines and to give me a basic shape for the red smile before filling it in with the sponge. it was a very simple design and so a good place to start. Fiona was then left with a mirror to perfect her happy and sad face.


 Next it was my younger daughter's turn and she chose a pirate. I had sponges and a paintbrush and she enjoyed the foam sponges on her face but she didn't enjoy staying still meaning the spots on her bandanna aren't very good!

And again, the internet gave Fiona the idea for Hello Kitty which was also within my skill level!


Definitely a good craft to develop for the British rainy days! By letting them choose they were even happier to be my guinea pigs and don't seem to notice the mistakes. If I'd had more time, I would have made more accessories for them to really get into character and engage in imaginative play while I could get on with other grown up crafts. I can't complain though as they did play long enough for me to have a cup of tea in peace before bath time where I washed it all off!
Wk 20- Crochet blanket
Wk 19 Cat's Ears
I think I said in a post earlier in the week that I was making 11 sets of ears but it was actually 10 in the end. Danielle bought the fur and head bands and I just had to sew them together. I had made ears out of fur for the aprons I did before Easter but haven't exactly done this before. The time frame was a challenge as it was under a week to do all 10 and so that's why I decided to use it as my project this week. Each band took about 40mins although I think I began to get faster.


I began by cutting a template out and used it to cut out 2 triangles

I then sewed these together, right side to right side on the machine.

I repeated this process to give me two ears and then attached them to the head band by sewing around both the band and through the fabric. Once I knew it worked and I knew Danielle was happy with the size, I cut out 36 more triangles to create 18 more ears. They are bigger than I would make them if they were just for playing with at home or for a fancy dress costume, but they need to stand out on a stage so are a little larger.

I then chose ears of similar sizes and laid them out ready to attach onto the bands.

I found that I was sneezing a lot due to the amount of fibre that came off the fur. (I felt like I was in a hairdressers at the end of the cutting).

The rest had to be done by hand and so I was able to finish them while watching the Apprentice and 'You're Fired'.

I asked my own little kitten to model them for me but she refused to stand against the door so the image isn't as clear as the ears blend into the picture behind. The face painting has made me consider doing this for a future challenge as I have wanted to improve my technique (I can only do a tiger reasonably well). So perhaps I will try and master a few more designs.

Wk 18- Salt Dough
It was my turn to lead an activity in the parent's group I attend and with it being half term, we decided to do something child orientated that they could participate in. Salt Dough is a very cheap and easy craft to do with children of most ages and there are many many possibilities. Kirsty Alsop showcased salt dough letters in her Christmas show last year when the children made and decorated letters spelling out 'Merry Christmas'. Since there could potentially be a lot of kids, i decided to do a test run with my own kids first. I discovered a website that gave instructions on how to bake it in the microwave, which elevated this in my status as also quick. Previously I had baked it in the oven which takes 3-6 hours. My 2 and 4 year old girls are NOT that patient! But you can bake them for 3 mins on full power in the microwave, and if that doesn't make them go hard, you can then bake them for an extra 30 seconds at a time.
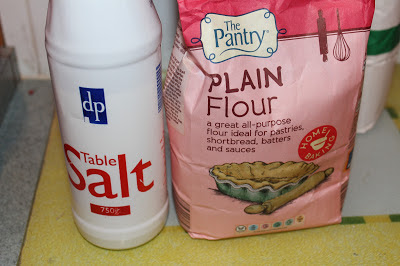
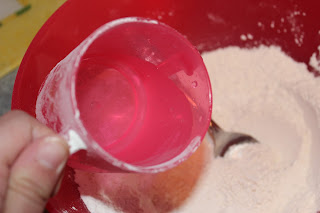
To make, mix one cup of flour with 1/2 cup of salt and then gradually add 1/2 cup of water. Fold flour and salt in together and knead into a ball.

I broke this into lots of smaller pieces as they are easier for children to work with and then gave them each a rolling pin and cookie cookers.
The dough needs to be rolled out to 1/2 centimetre if using cookie cutters which is also good for keeping the baking time down!

I chose to use a large heart as I planned to put holes in them and any smaller would have little surface area to work any pattern onto.

I decided to make a sort of medallion/ keepsake as I thought the children could imitate it. I used a cocktail stick but the end of a paintbrush would be safer!

I used a cocktail stick to make a hole and then it was time to bake them.

Once baked, they could be painted.


Once painted and dry, I threaded beads and the medallions onto string to create this colourful garland

I used letter shapes to cut out letters for a name plaque for my eldest's room. Once painted, I mounted them onto card covered in pretty paper and blue-tacked it to her door.

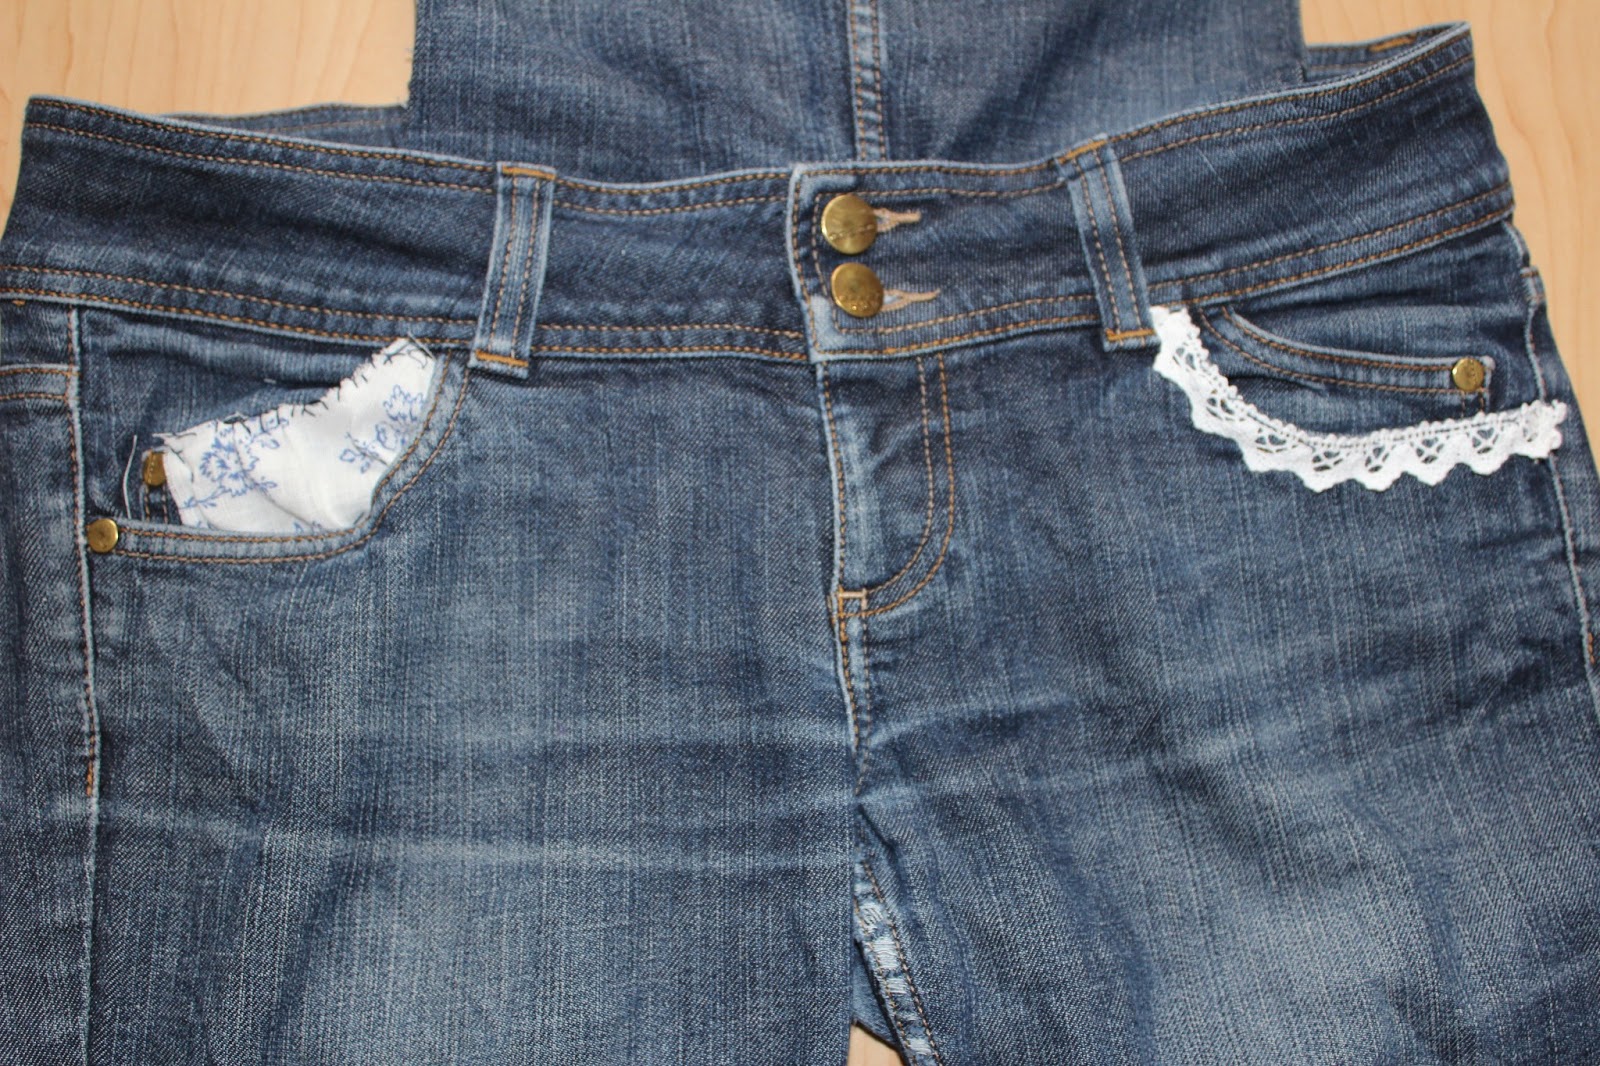
Wk 17- Up-cycled Dungarees
Unfortunately, my 7 year old jeans acquired a hole in the knee but they still fitted me well.
Rather than putting them into a fabric pile, I decided to attempt a transformation. I love dungarees and can't always find them. I also like long shorts (rather than hotpants) so decided to try and combine the two. I also knew that the length of the shorts could be a little too masculine and thus some pretty-ing up would be required. Here is the result and how I got there;

I began by looking at a dungaree dress I have for an idea of size and proportion (although it is maternity). I then carefully cut off the bottom of the leg under where the hole in the knee was.


I then folded the jeans over and cut off the other leg. Using the material than had been cut away, I was able to create 2 long strips for the straps, i piece for the back and then I opened one leg at one seam so that the the outer, thicker seam would be a feature on the front chest panell.

 On 3 sides, I sewed wrong side to wrong side and then was able to turn inside out and then finish off with 2 line of stitching. I also added some floral fabric to the bottom of each leg to neaten up the ragged edge. Working with several layers of denim did, however, break a needle. It had needed to be replaced though as it was getting old and blunt!

I used some remnant denim to make loops for the buttons. This creates a feature of the buttons but more importantly for me, it's easier than sewing button holes through thick layers.


I used matching buttons for little bows at the bottom of each leg and then put an insert into one pocket, and lace trim on the other,

I added some crochet lace to the back pockets too by hand stitching them in place.

With the recent warm weather, I have been able to wear them and they fit like an old pair of jeans! They're very practical for feeding the new addition too so a good make methinks.
Wk 16- Customised baby vests
I suppose this is a little bit of a cop-out since it isn't a difficult challenge, but haven't really customised clothes like this before and I don't do freehand stitched writing either. Therefore, I have given myself a less intimidating project after having our little man.

Before we knew our baby was blue, we were given a pack of plain white vests. You can't beat plain vests as they don't show under clothes (especially important with little girl summer dresses etc!) However, it is also nice to have the odd details. Long slogans would be cramped on a small space and so I opted for simplicity. Last year, I bought some fabric hearts off ebay which had already been fixed to bondaweb. There is a blue theme mostly but the fabrics include liberty, Laura Ashley and Cath Kidston.

I chose 3 that I liked for this project and then ironed them onto the vests.


Then I stitched around them to add reinforcement that they will need for their many times in the wash. It also prevents them from fraying.


Heart Breaker


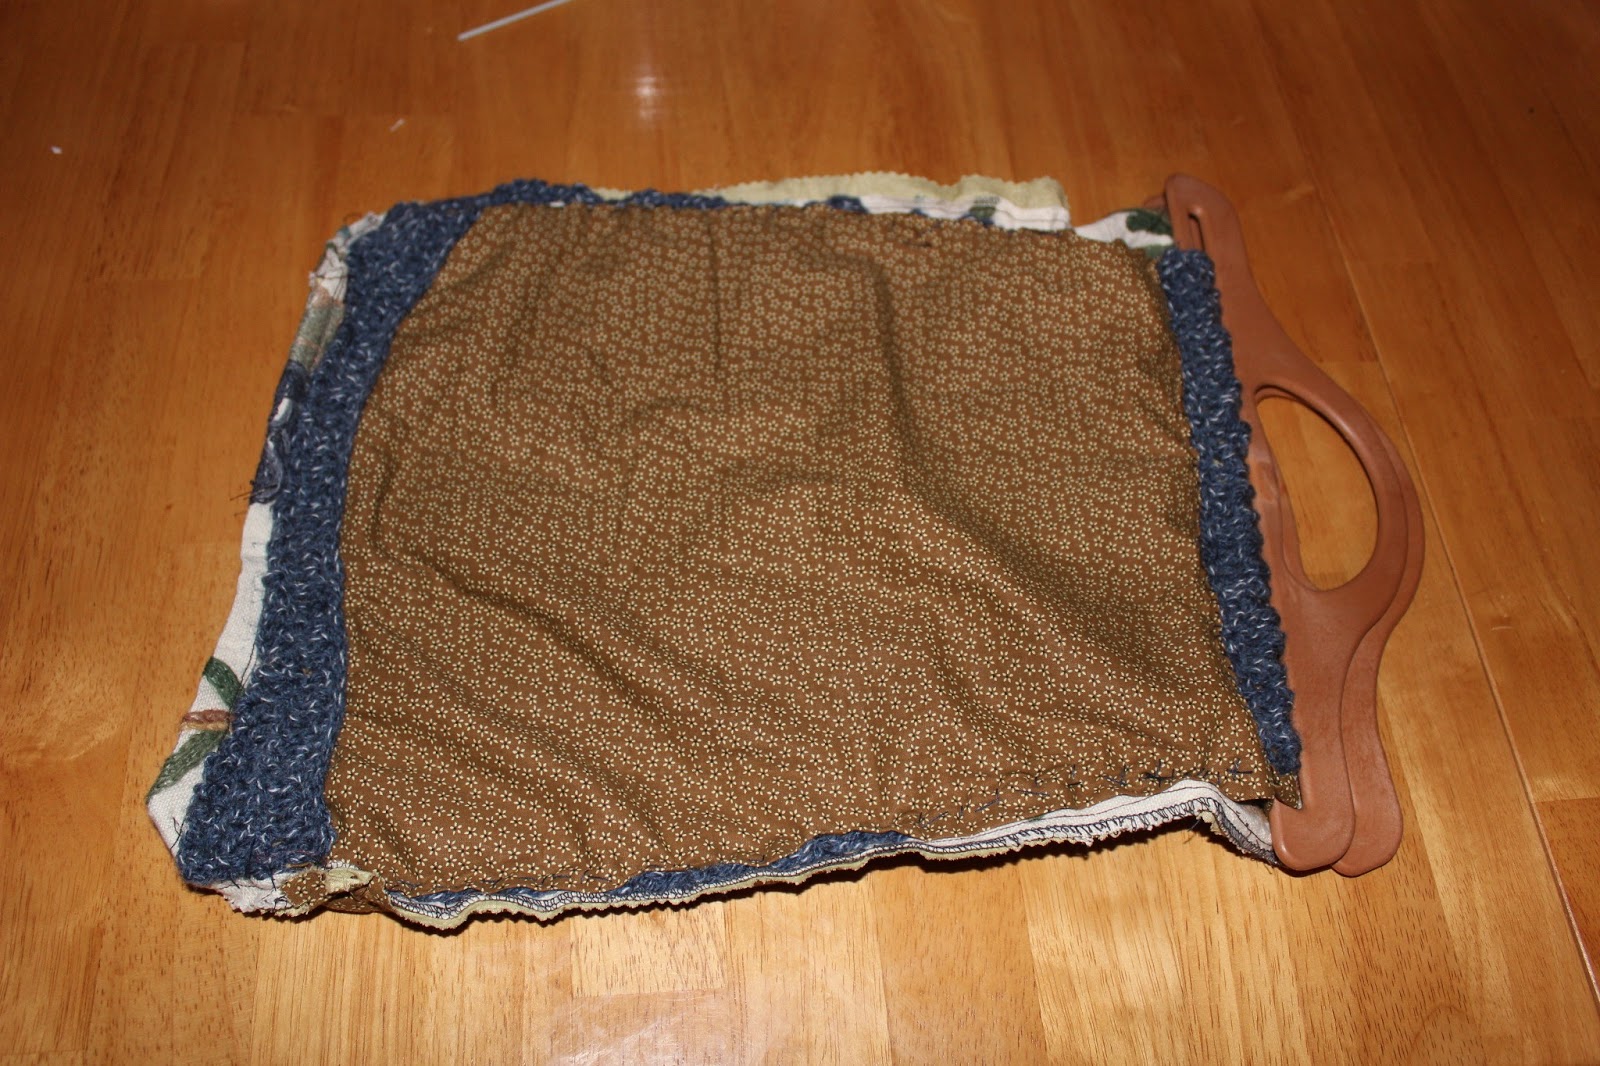
Wk 15- Garden kneeling Pad
My Dad is a keen gardener and has his name down for an allotment. In the meantime, his garden is a sanctuary but despite his young years, he has begun to suffer with some arthritis I saw a lovely collection of gift ideas for Gardeners although I think they were aimed predominantly at women. One of which was a gardening kneeling pad and so I decided I would make one for my Dad... for Christmas. Okay, so that didn't happen as I was so sick in the run up to the festive season. The foam pad and lovely Laura Ashley spotted fabric has sat there looking at me and so, April comes around and I decide to make it for his birthday instead. (Let's be fair, he lives in Malvern and with all the snow this year, it wouldn't have been appreciated in December as much as now).
 With such a long intro, I'll try to keep the step-by-step a little more brief! I used the foam as a template and drew around it on the wrong side of the PVC coated cotton giving a 1cm seam allowance.

I then used this piece to draw around for the bottom piece
.

I used a contrasting minty green for the edge and cut out 4 sections for each side of the pad. Initially I thought that 4 sections would be better as the corners would be more crisp, but the foam pad was curved so that idea went out of the window!

I cut one of the side green sections into 2 narrow strips for the zip to attach to. I chose a mint-green long zip and sewed each side to the narrow pvc coated strips. With the thicker material that is slippy, I took my time to try and get the zip straight.

I then sewed this piece to the others so that they formed one long section.

These were then sewed right sides facing to one of the blue sections. I started at the back of the pad where the zip would be to ensure it would be central (I didn't want it to go around a corner making it difficult to get the pad in and out!had to cut a few nicks into the green strip at corners so that the piece would bend when turned the right way and not pucker.

The first moment of truth was seeing if the foam pad would fit in here...

...and it did comfortably. Now to sew on the top which was a little more tricky with the thickness of the two pieces in addition to the curved corners. Fortunately, i was able to open the zip and gain maneuverability around the corners.

Inside out, the pouch looked fine although there were a few places where I had to re-sew as they looked vulnerable to tears or the sewing was a little too close to the seams.

Turned the right way through, the second moment of truth; will the pad fit through the zip and fit?

YES! It was a little roomy which is perfect as when the foam pad is compressed (with knees resting upon it), the air sucks out and the pad fills the space. But also, it means over time, extra wadding can be added as 'kneeded'. Ok, ok I couldn't resist it!
And my dad was very pleased with it :D
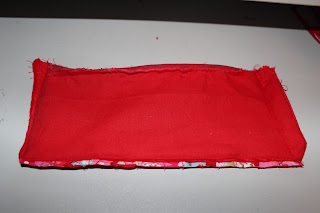
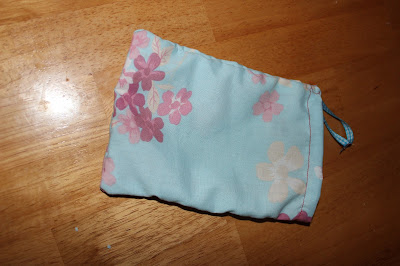
Wk 14- Purse/make up bag
I was quite careful in cutting out the petals from the Cath Kidston squares and had a few strips left. I thought they would be perfect for making up a small purse but then, after lining them up, I thought I could make a long thin pencil case type purse or make up bag instead.
 I knew that it would be a little scrappy looking so thought it might be a good idea to hide this by using ric rac and disguise it as though intentionally scrappy!
 I had lots in this colour scheme and so then looked for the back and lining. I had some lovely red velour fabric which was left over from the Christmas stash and some plain red cotton sheeting.

I lined all the pieces up and then cut the ric rac into the correct lengths. Then I was able to cut out 2 pieces of red cotton, and one piece of the velour for the back. I chose a co-ordinating deep red zip and piece of lace for a finishing touch and cut it to size too.

I started by sewing each strip onto the red sheeting. My machine is a little temperamental with the zig zag stitch with thicker cotton and this thread is from Ikea and has been brilliant. Although, it means I had to do a straight stitch for each piece, and then sew the ric rac over the seams where each piece met. By doing it this way, i didn't lose any of the (already) narrow strip! Once all sewn on together, I sewed in the zip, wrong sides facing, and then lastly, the lace.
 I sewed the red velour to the red cotton right sides facing on 3 sides and turned the right way. I then sewed up the open end to the zip- right sides facing so that I had 2 rectangles of red cotton with the patched pieces on one, and the velour on the other, with each side of the zip connecting them.
I opened the zip and then sewed the remaining sides of the rectangles together- patched pieces facing the velour and then turned the purse through the right way through the opened zip.
 And here is the finished purse. I am delighted with it- especially since it was made from scraps! It's such a sense of accomplishment to have made something from what is seemingly nothing.
 If i were in school, this could be a school bag and pencil case but instead it will be for my magazines and makeup! It's not often I keep the things I make these days, but this was part of my present so I feel very justified and smug!
Wk 13- Dresden Plate bag, Cath Kidston
During the Easter break, we visited family we haven't seen since before Christmas so there were a few belated presents to be opened. I received this book- my sister-in-law knows me well! I have the 'Sew' book and love it but I REALLY love this one. More than the projects, I enjoyed reading all the little bits from Cath Kidston about how her love for sewing came about. Her fabric and product range are so well known, it is lovely to read about the same pleasures to be gained from re-using and upcycling old things.
 The book comes with fabric squares, canvas straps and a piece of calico to make either a cushion or a bag. I did take pictures on my phone but I can't seem to upload them on here.
The book gives clear instructions and so I decided to try this project for week 13. I have never tried the paper piecing with patchwork so I felt is was a perfectly simple project to attempt. I did not anticipate how time consuming it would be! The cutting out of paper, then the fabric, sewing the paper to the fabric, then the petals to each other, unpick the initial stitches and remove paper! That took 6 hours over 4 nights. And it was only one panel. I have new found respect for the makers of this style of quilt!
 Once the petals of all the flower are constructed, the rest was straightforward in making up the bag and attaching the flower to the front. One part I really liked was the suffolk puff (or yo yo) that makes up the centre of the flower and I hope to feature some more in future projects!

I do have more pictures (on my phone) of the bag in progress but here is the finished product. If I ever work out how to get the pictures on here I will upload them. I used red thread (as I had no white left) but really like the contrast. Of course, every little wobble shows up but this is for me so I don't mind.

Wk 12- Bunny pinafore post on main page
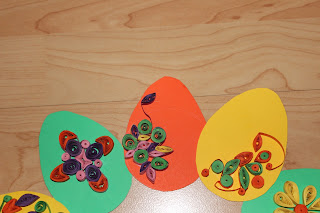
Wk 11- Quilling an Easter wreath
A few years ago, a friend bought me a quilling set which at the time, I knew nothing of. I've since seen beautiful creations using this craft and in particular, this on pinterest.
 Using this as my inspiration, I dug out the kit and found a tutorial on youtube to help me get started. I picked out a simple palette of colour and began rolling.
 Using the little pen/ utensil, I threaded the thin ribbon of paper through the gap at the top (just holds in place) and then rolled the paper right up to the end.
 Once rolled, I pulled the tight circle off the tool and, whilst not letting go, released some tension to create a loose circle.
 I then glued the end down and then squeezed each end to create the leaf shape.

I used this flower for the scale of the egg shapes and cut it out. Using this as a template, I cut 8 more egg shapes from the coloured card I had selected. I then just started creating flowers, swirls and shapes. I completed 3 each night- it isn't a quick craft! After 3 nights, I had decorated eggs.

Here are some close up shots of the eggs grouped together.


Wk 10- flower girl dresses
As you will be aware, we have had wedding preparations taking place around us as our good friends were getting married. They had asked our 2 girls to be flower girls but financially we are tight and so the prospect of buying dresses, shoes, tights and cardi's led me to the foolish decision to make their dresses. All was going well; the youngest is quite slight so i started with her first and gave myself 2 weeks ahead from the wedding. I eventually got the bodice right- VERY snug, but fitted and then the skirt. There were many unpicking incidents and i nearly lost the plot, but finished her dress with 3 days to spare. But then came the eldest's dress. I have made quite a few things for her and she is very easy to cater to but the foot on my machine kept falling off, i ran out of white cotton and on the Saturday morning of the wedding when i had approx 1 hour work left, we had a flat tyre meaning I had to watch the girls instead of the peaceful, calm time I had anticipated having! To say I was embarrassed by Fiona's dress is an understatement! Learning curve here- NEVER TRY TO MAKE SOMETHING FOR AN IMPORTANT OCCASION IN A HURRY.
Here are the pics from the wedding of the girls sporting their dresses:

 This actually conceals the worst part of the dress which was the skirt- rather than being A line, it was more pencil! They matched though and coordinated with bridesmaids! You may recognise the material which has been amazing value. A silk double sheet from a charity shop for £3 has made 2 dresses, a medium quilt, cushion and i still have some left!


Wk 9- Crewel and Crochet bag
When I first decided that I was going to have a go at making and selling created bits, I really thought I would focus on bags. So I went along to Aberkhan's in Liverpool and bought a selection of bag related items- handles, magnetic clasps, charm keyrings etc.


That was around a year ago and I have hardly touched them. I felt it was about time I had a go and so started to look through books and material stashes to find ideas.

I love Crewel work- the embroidery which is a combination of chain stitch in Jacobean styles and colours- but it is VERY expensive to buy by the meter and not readily available other than the internet and then there is delivery cost on top. Perhaps 18 months ago, I won a lot on ebay of sample pieces and thought they would be ideal for cushions and bags etc and thus the idea came to create a bag, using some of the said handles.
 These handles were the same width as the piece and toned in really well with the beige colour that was in this piece.
 I selected a neutral but corresponding tone for the lining and stitched together on the machine, right sides facing leaving the top section open to finish by hand.


For the other side, I wanted to do someting a little different and decided to do a crochet back. I have used crochet and crewel together before and love the overall finished. effect I found this lone ball of wool, purchased in a charity shop for 50p!

Again, I was really pleased that the blue toned in perfectly with the vibrant blue in the crewel piece. I couldn't find a large crochet hook though and so the crewel knit section took longer than I had wanted.

I am the first to admit that I am not the best at crochet! I started last January so it has only been little over a year and even then, I haven't practised too much! I find thicker wool and hooks more forgiving and without a pattern to follow, my novice status is all the more noticeable! However, I had the rough shape I needed and somewhat of a pattern that I was happy enough with. The beauty of combining crochet with something else in this way gives me more scope to remedy the mistakes here of wobbly edges!

I used the same fabric for lining the crochet piece and sewed them together with some of the crochet overlapping the lining on the inside.

Again, I threaded the now lined crochet piece through the handle and hand sewed it down using a navy thread so the stitches cannot be seen.

This done, I could then hand sew the crewel piece to the crochet piece, right sides facing, ensuring to leave a good 2" gap at the top of each side to get in and out of the bag itself.

And here is the finished product! One side crochet and the other side Crewel. As sample pieces of crewel, there are no two bits alike and well- my crochet is never the same twice so this really is a unique bag. I think it makes a perfect knitting/ crochet bag as it's thick and sturdy with lots of rooms for wool, needled and a magazine/ pattern. A new addition to my craft stall on Good Friday-yes I know I said the last one would be the final one before baby comes, but this was too good to refuse!


 This was made from a long narrow strip of crewel work. I ummed and ahhed for ages about what to do with this one but felt that sewing them alongside this was created a nice effect. No crochet back this time, but I did line it with a plum material for a little flash of colour. The back is made from a canvas place mat- just the perfect size for the bag. I opted for small handles making this a good book/ magazine bag.


Lastly is a cream crewel piece with a chunky cream crochet side. I also did a little crochet shoulder cushion for extra detail. This is finished with a magnetic clasp and also lined with a thick cream cotton. The crewel piece is worked on a rough canvas which makes an interesting combination with the soft wool. I love this piece but could never keep it clean personally!


Wk 8- Hen Goodies
Next week is a good friend's hen do. It's a daytime and night-time event and I have committed to making goody bags for all those who come to the daytime part and there will be other crafty things going on like cupcake decorating and jar conversions. The bride-to-be loves pink and so there will be a pink theme so I have looked through my fabric stash and found this material. Obviously I need quite a lot as there could be 30+ there!
 I chose this material which was a duvet cover as I also hope to make bunting and perhaps place mats etc if I have time and enough left.
 I cut the material into equal rectangles with the pinking shears to save time with hemming.
 I sewed up 3 sides leaving 1" on one side to turn over the top for the channel that the ribbon would pass through.
 This allowed for the ribbon to move freely at the ends to create a draw string effect. I wasn't thrilled with the ribbon choice but I had a LOT of this and so went with it. It didn't clash and so i was happy enough.
 And here is the finished bag. They needed to be big enough to hold the jars but not too big either as they are just little goodie bags. We will be playing Mr and Mrs so I hope to put the answers of the quiz in each bag so the guests get to know the bride and groom a little better too.
I made 15 bags in the end as only 12 guests have confirmed they are coming. The other aspect of the crafty bit was the jar decorating so I had a go at some myself as an example piece. Using the colour scheme from the bags, I chose blue and pink with a white doilie for the collar.

 I then cut a piece of the blue tissue paper to the desired width and again using rolled over sticky tape, stuck the tissue paper down.
 In the past, I have cut the doilies into sections and stuck each section down, but I quite liked this sticking out with a collar and so kept the rim of the doilie as one piece and stuck down.
 To finish, I tied some pink rafia ribbon around the rim. The flowers can only be seen when there is a candle lit inside and as an example piece, I am very pleased with this one.
 Here it is inside the goody bag. I hope they like them :D

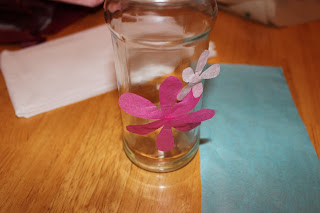
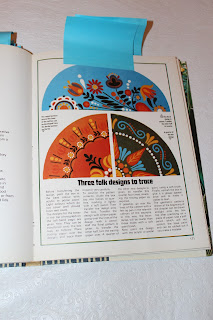
Wk 7- handbag charm
I have been wanting to create some handbag charms for a little while and had bought the key rings to do them but they have sat in a box for 6 months or more :s With creating handbags and totes, i thought a little keyring would help to individualise them. I posted at the beginning of this challenge an image in a book of some folk art and this was my inspiration for the piece.
I did my own pattern but used some of the shapes in the images above and the main design relies on repetition. Since my camera was dead, I took pictures on my phone but I don't know how to upload them! I'm useless at the moment- sorry! My ankle is lots better now but has slowed me down even more than my usual 7 month pregnancy pace!) I used a cup to draw around to get the circle and then drew a few designs on a piece of paper. Once I was happy with one of them, i traced it onto some thin white cotton in black biro. I chose basic primary coloured cotton thread (and a grassy green) from Ikea as I felt they had a traditional folky brightness. Using a series of satin stitch and French knots, I filled in the pattern. I don't have an embroidery hoop, so it was slow going! I carefully cut around the outside of the circular design using pinking shears leaving a 5mm seam allowance to turn under.
I chose some blue felt for the backing and a stretchy primrose yellow frill edging. I also had a short piece of a 1cm primrose velvet ribbon to hang the embroidered medallion to the keyring.

I then used the yellow rim to edge the medallion whilst turning under the white seam allowance. This was quite time consuming also in trying to keep it neat and flat. Once finished, I cut out a circle of blue felt using the same cup for the template.and then used very small stitches in blue thread to attach the embroidered piece to the felt.

I left a gap at the top to insert the primrose velvet ribbon and then looped it through the keyring and sewed in place.

And here it is. I wished I had left a longer section of the velvet ribbon but this way it can be a keyring or a handbag charm. For the size of it, you wouldn't know it took me close to 4 hours to make, although that's more to my slow embroidery than anything else I think!
Wk 6- Scarf bags
The title may be a little misleading as I did use more than a scarf for these bags but they were all made with one scarf as their inspiration and each have parts of it's paisley design appliquéd onto them.
 In all honesty, I made this tote quite a while ago and have been meaning to do more with the scarf but this challenge was as much about how many different ways I could use the scarf to create distinct pieces.


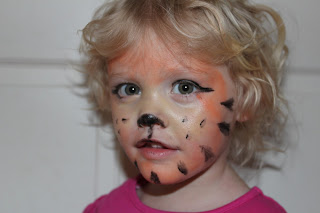
I also attempted a tiger on the youngest- more successful this time I feel! It was a similar approach to the clown. I created a base of yellow using a sponge and then blended orange in around the edges. Using a black paintbrush, I outlined her eyes, coloured in her nose and painted the lines around her face.

And again, the internet gave Fiona the idea for Hello Kitty which was also within my skill level!


Definitely a good craft to develop for the British rainy days! By letting them choose they were even happier to be my guinea pigs and don't seem to notice the mistakes. If I'd had more time, I would have made more accessories for them to really get into character and engage in imaginative play while I could get on with other grown up crafts. I can't complain though as they did play long enough for me to have a cup of tea in peace before bath time where I washed it all off!
Wk 20- Crochet blanket
Wk 19 Cat's Ears
I think I said in a post earlier in the week that I was making 11 sets of ears but it was actually 10 in the end. Danielle bought the fur and head bands and I just had to sew them together. I had made ears out of fur for the aprons I did before Easter but haven't exactly done this before. The time frame was a challenge as it was under a week to do all 10 and so that's why I decided to use it as my project this week. Each band took about 40mins although I think I began to get faster.
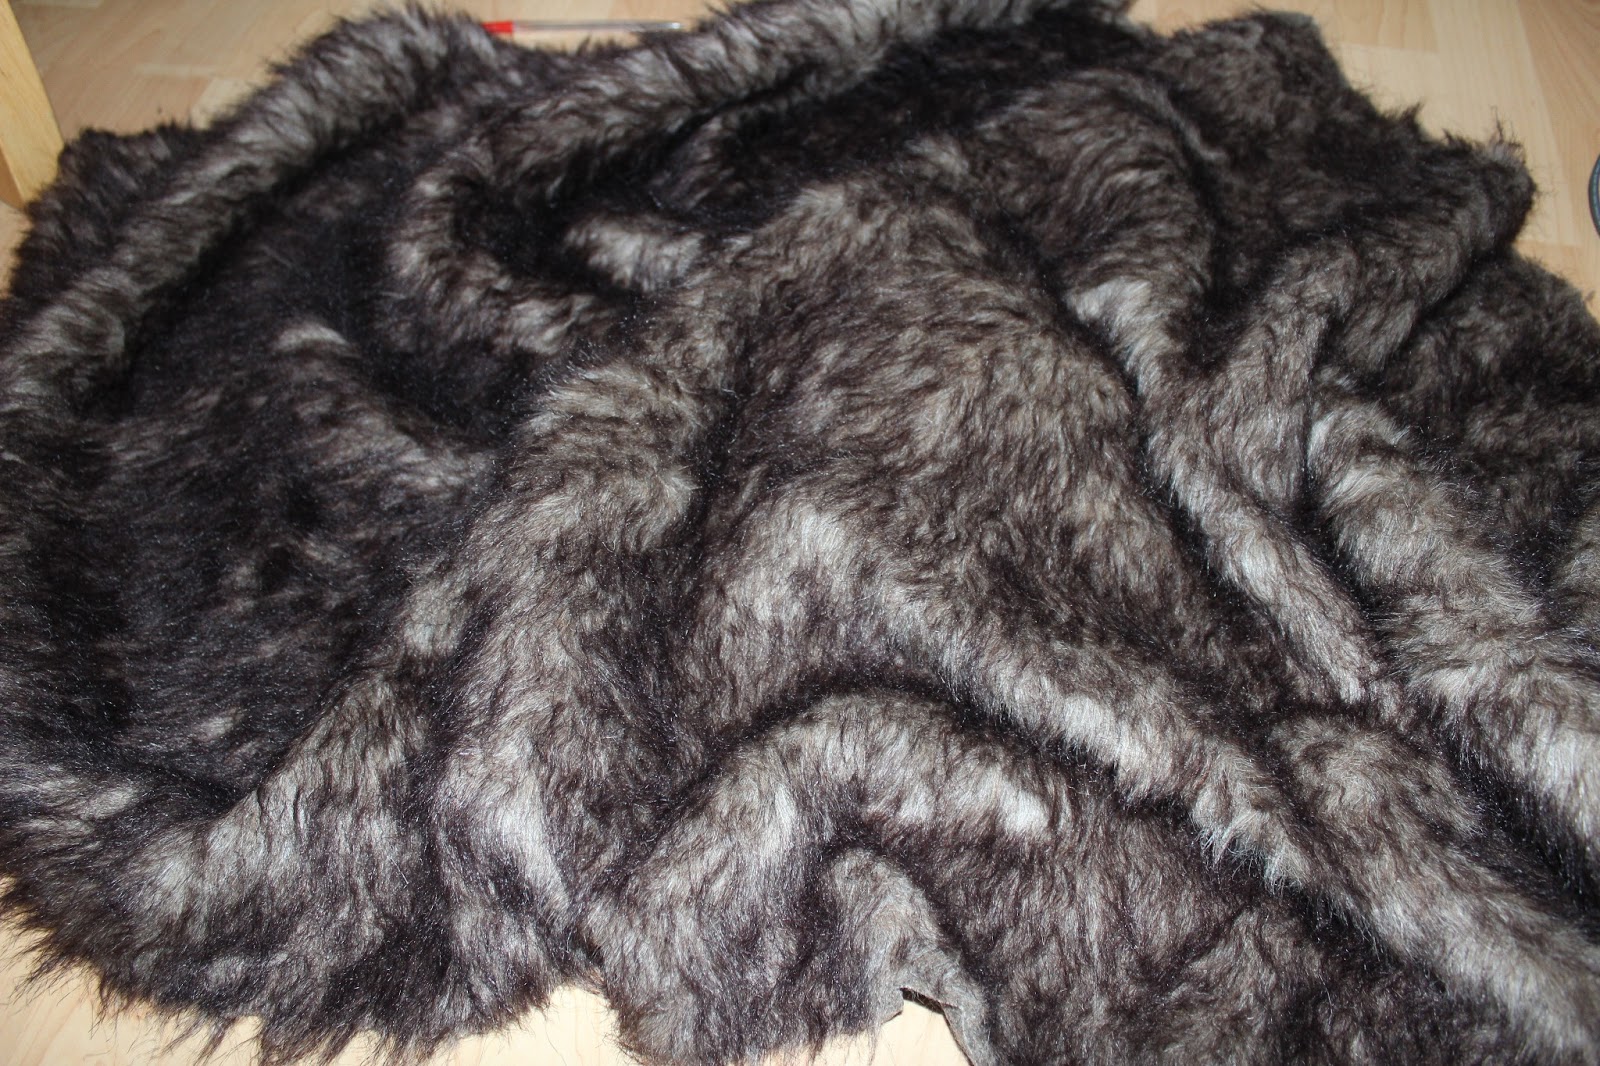


I began by cutting a template out and used it to cut out 2 triangles

I then sewed these together, right side to right side on the machine.

I repeated this process to give me two ears and then attached them to the head band by sewing around both the band and through the fabric. Once I knew it worked and I knew Danielle was happy with the size, I cut out 36 more triangles to create 18 more ears. They are bigger than I would make them if they were just for playing with at home or for a fancy dress costume, but they need to stand out on a stage so are a little larger.

I then chose ears of similar sizes and laid them out ready to attach onto the bands.

I found that I was sneezing a lot due to the amount of fibre that came off the fur. (I felt like I was in a hairdressers at the end of the cutting).

The rest had to be done by hand and so I was able to finish them while watching the Apprentice and 'You're Fired'.

I asked my own little kitten to model them for me but she refused to stand against the door so the image isn't as clear as the ears blend into the picture behind. The face painting has made me consider doing this for a future challenge as I have wanted to improve my technique (I can only do a tiger reasonably well). So perhaps I will try and master a few more designs.

Wk 18- Salt Dough
It was my turn to lead an activity in the parent's group I attend and with it being half term, we decided to do something child orientated that they could participate in. Salt Dough is a very cheap and easy craft to do with children of most ages and there are many many possibilities. Kirsty Alsop showcased salt dough letters in her Christmas show last year when the children made and decorated letters spelling out 'Merry Christmas'. Since there could potentially be a lot of kids, i decided to do a test run with my own kids first. I discovered a website that gave instructions on how to bake it in the microwave, which elevated this in my status as also quick. Previously I had baked it in the oven which takes 3-6 hours. My 2 and 4 year old girls are NOT that patient! But you can bake them for 3 mins on full power in the microwave, and if that doesn't make them go hard, you can then bake them for an extra 30 seconds at a time.


I broke this into lots of smaller pieces as they are easier for children to work with and then gave them each a rolling pin and cookie cookers.
The dough needs to be rolled out to 1/2 centimetre if using cookie cutters which is also good for keeping the baking time down!

I chose to use a large heart as I planned to put holes in them and any smaller would have little surface area to work any pattern onto.

I decided to make a sort of medallion/ keepsake as I thought the children could imitate it. I used a cocktail stick but the end of a paintbrush would be safer!

I used a cocktail stick to make a hole and then it was time to bake them.

Once baked, they could be painted.


I haven't managed to do it yet, but I plan on threading ribbon through the two holes at the top and then wrapping these around pillar candles. They could be done in a smaller shape and used as napkin rings with initials of guests and also act as place settings.


Once painted and dry, I threaded beads and the medallions onto string to create this colourful garland

I used letter shapes to cut out letters for a name plaque for my eldest's room. Once painted, I mounted them onto card covered in pretty paper and blue-tacked it to her door.

Wk 17- Up-cycled Dungarees
Unfortunately, my 7 year old jeans acquired a hole in the knee but they still fitted me well.


Rather than putting them into a fabric pile, I decided to attempt a transformation. I love dungarees and can't always find them. I also like long shorts (rather than hotpants) so decided to try and combine the two. I also knew that the length of the shorts could be a little too masculine and thus some pretty-ing up would be required. Here is the result and how I got there;

I began by looking at a dungaree dress I have for an idea of size and proportion (although it is maternity). I then carefully cut off the bottom of the leg under where the hole in the knee was.


I then folded the jeans over and cut off the other leg. Using the material than had been cut away, I was able to create 2 long strips for the straps, i piece for the back and then I opened one leg at one seam so that the the outer, thicker seam would be a feature on the front chest panell.

I chose a pretty linen fabric to line the panels and straps and used the denim pieces as templates to cut around.


I used some remnant denim to make loops for the buttons. This creates a feature of the buttons but more importantly for me, it's easier than sewing button holes through thick layers.


I used matching buttons for little bows at the bottom of each leg and then put an insert into one pocket, and lace trim on the other,
I added some crochet lace to the back pockets too by hand stitching them in place.

With the recent warm weather, I have been able to wear them and they fit like an old pair of jeans! They're very practical for feeding the new addition too so a good make methinks.
Wk 16- Customised baby vests
I suppose this is a little bit of a cop-out since it isn't a difficult challenge, but haven't really customised clothes like this before and I don't do freehand stitched writing either. Therefore, I have given myself a less intimidating project after having our little man.

Before we knew our baby was blue, we were given a pack of plain white vests. You can't beat plain vests as they don't show under clothes (especially important with little girl summer dresses etc!) However, it is also nice to have the odd details. Long slogans would be cramped on a small space and so I opted for simplicity. Last year, I bought some fabric hearts off ebay which had already been fixed to bondaweb. There is a blue theme mostly but the fabrics include liberty, Laura Ashley and Cath Kidston.

I chose 3 that I liked for this project and then ironed them onto the vests.


Then I stitched around them to add reinforcement that they will need for their many times in the wash. It also prevents them from fraying.
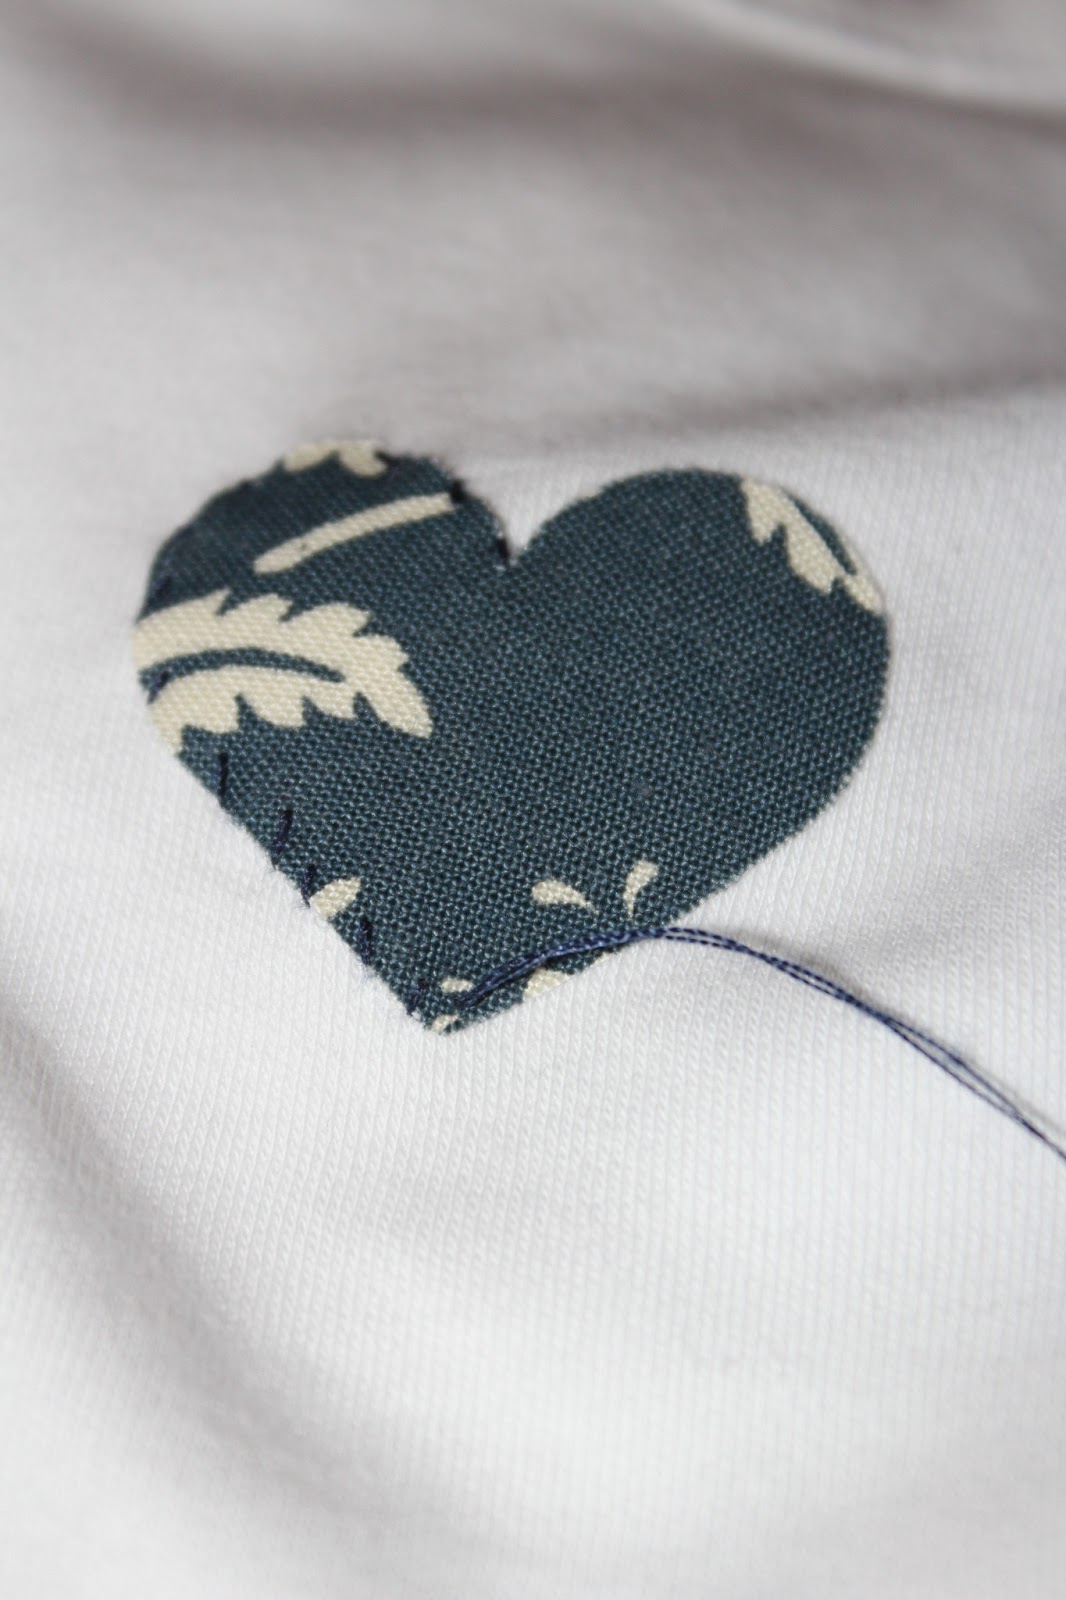
I chose short phrases- love mom's milk (not 'mix' as my husband keeps saying although the 'k' was a little like an 'x')

Heart Breaker

And I left the last one without a slogan as I like the mock-tattoo 'look'.
The 3 vests were embellished within 2 hours which I consider reasonable but I will be a little more ambitious in the weeks to come!

Wk 15- Garden kneeling Pad
My Dad is a keen gardener and has his name down for an allotment. In the meantime, his garden is a sanctuary but despite his young years, he has begun to suffer with some arthritis I saw a lovely collection of gift ideas for Gardeners although I think they were aimed predominantly at women. One of which was a gardening kneeling pad and so I decided I would make one for my Dad... for Christmas. Okay, so that didn't happen as I was so sick in the run up to the festive season. The foam pad and lovely Laura Ashley spotted fabric has sat there looking at me and so, April comes around and I decide to make it for his birthday instead. (Let's be fair, he lives in Malvern and with all the snow this year, it wouldn't have been appreciated in December as much as now).


I then used this piece to draw around for the bottom piece
.

I used a contrasting minty green for the edge and cut out 4 sections for each side of the pad. Initially I thought that 4 sections would be better as the corners would be more crisp, but the foam pad was curved so that idea went out of the window!

I cut one of the side green sections into 2 narrow strips for the zip to attach to. I chose a mint-green long zip and sewed each side to the narrow pvc coated strips. With the thicker material that is slippy, I took my time to try and get the zip straight.

I then sewed this piece to the others so that they formed one long section.

These were then sewed right sides facing to one of the blue sections. I started at the back of the pad where the zip would be to ensure it would be central (I didn't want it to go around a corner making it difficult to get the pad in and out!had to cut a few nicks into the green strip at corners so that the piece would bend when turned the right way and not pucker.

The first moment of truth was seeing if the foam pad would fit in here...

...and it did comfortably. Now to sew on the top which was a little more tricky with the thickness of the two pieces in addition to the curved corners. Fortunately, i was able to open the zip and gain maneuverability around the corners.

Inside out, the pouch looked fine although there were a few places where I had to re-sew as they looked vulnerable to tears or the sewing was a little too close to the seams.

Turned the right way through, the second moment of truth; will the pad fit through the zip and fit?

YES! It was a little roomy which is perfect as when the foam pad is compressed (with knees resting upon it), the air sucks out and the pad fills the space. But also, it means over time, extra wadding can be added as 'kneeded'. Ok, ok I couldn't resist it!
And my dad was very pleased with it :D
Wk 14- Purse/make up bag
I was quite careful in cutting out the petals from the Cath Kidston squares and had a few strips left. I thought they would be perfect for making up a small purse but then, after lining them up, I thought I could make a long thin pencil case type purse or make up bag instead.


I lined all the pieces up and then cut the ric rac into the correct lengths. Then I was able to cut out 2 pieces of red cotton, and one piece of the velour for the back. I chose a co-ordinating deep red zip and piece of lace for a finishing touch and cut it to size too.

I started by sewing each strip onto the red sheeting. My machine is a little temperamental with the zig zag stitch with thicker cotton and this thread is from Ikea and has been brilliant. Although, it means I had to do a straight stitch for each piece, and then sew the ric rac over the seams where each piece met. By doing it this way, i didn't lose any of the (already) narrow strip! Once all sewn on together, I sewed in the zip, wrong sides facing, and then lastly, the lace.


I opened the zip and then sewed the remaining sides of the rectangles together- patched pieces facing the velour and then turned the purse through the right way through the opened zip.


Wk 13- Dresden Plate bag, Cath Kidston
During the Easter break, we visited family we haven't seen since before Christmas so there were a few belated presents to be opened. I received this book- my sister-in-law knows me well! I have the 'Sew' book and love it but I REALLY love this one. More than the projects, I enjoyed reading all the little bits from Cath Kidston about how her love for sewing came about. Her fabric and product range are so well known, it is lovely to read about the same pleasures to be gained from re-using and upcycling old things.

The book gives clear instructions and so I decided to try this project for week 13. I have never tried the paper piecing with patchwork so I felt is was a perfectly simple project to attempt. I did not anticipate how time consuming it would be! The cutting out of paper, then the fabric, sewing the paper to the fabric, then the petals to each other, unpick the initial stitches and remove paper! That took 6 hours over 4 nights. And it was only one panel. I have new found respect for the makers of this style of quilt!


I do have more pictures (on my phone) of the bag in progress but here is the finished product. If I ever work out how to get the pictures on here I will upload them. I used red thread (as I had no white left) but really like the contrast. Of course, every little wobble shows up but this is for me so I don't mind.

Wk 12- Bunny pinafore post on main page
Wk 11- Quilling an Easter wreath
A few years ago, a friend bought me a quilling set which at the time, I knew nothing of. I've since seen beautiful creations using this craft and in particular, this on pinterest.


I used this flower for the scale of the egg shapes and cut it out. Using this as a template, I cut 8 more egg shapes from the coloured card I had selected. I then just started creating flowers, swirls and shapes. I completed 3 each night- it isn't a quick craft! After 3 nights, I had decorated eggs.

Here are some close up shots of the eggs grouped together.


And here is my semi-completed wreath. I want to go around each egg with a ribbon of paper to raise the edges as the pinterest one has done. I may place something in the middle too before hanging it on my door this weekend. I am very pleased with my first attempt though :D

Wk 10- flower girl dresses
As you will be aware, we have had wedding preparations taking place around us as our good friends were getting married. They had asked our 2 girls to be flower girls but financially we are tight and so the prospect of buying dresses, shoes, tights and cardi's led me to the foolish decision to make their dresses. All was going well; the youngest is quite slight so i started with her first and gave myself 2 weeks ahead from the wedding. I eventually got the bodice right- VERY snug, but fitted and then the skirt. There were many unpicking incidents and i nearly lost the plot, but finished her dress with 3 days to spare. But then came the eldest's dress. I have made quite a few things for her and she is very easy to cater to but the foot on my machine kept falling off, i ran out of white cotton and on the Saturday morning of the wedding when i had approx 1 hour work left, we had a flat tyre meaning I had to watch the girls instead of the peaceful, calm time I had anticipated having! To say I was embarrassed by Fiona's dress is an understatement! Learning curve here- NEVER TRY TO MAKE SOMETHING FOR AN IMPORTANT OCCASION IN A HURRY.
Here are the pics from the wedding of the girls sporting their dresses:


Wk 9- Crewel and Crochet bag
When I first decided that I was going to have a go at making and selling created bits, I really thought I would focus on bags. So I went along to Aberkhan's in Liverpool and bought a selection of bag related items- handles, magnetic clasps, charm keyrings etc.


That was around a year ago and I have hardly touched them. I felt it was about time I had a go and so started to look through books and material stashes to find ideas.

I love Crewel work- the embroidery which is a combination of chain stitch in Jacobean styles and colours- but it is VERY expensive to buy by the meter and not readily available other than the internet and then there is delivery cost on top. Perhaps 18 months ago, I won a lot on ebay of sample pieces and thought they would be ideal for cushions and bags etc and thus the idea came to create a bag, using some of the said handles.


I threaded the top of the crewel piece through the gap in the handles and hand stitched it for ease.

For the other side, I wanted to do someting a little different and decided to do a crochet back. I have used crochet and crewel together before and love the overall finished. effect I found this lone ball of wool, purchased in a charity shop for 50p!

Again, I was really pleased that the blue toned in perfectly with the vibrant blue in the crewel piece. I couldn't find a large crochet hook though and so the crewel knit section took longer than I had wanted.

I am the first to admit that I am not the best at crochet! I started last January so it has only been little over a year and even then, I haven't practised too much! I find thicker wool and hooks more forgiving and without a pattern to follow, my novice status is all the more noticeable! However, I had the rough shape I needed and somewhat of a pattern that I was happy enough with. The beauty of combining crochet with something else in this way gives me more scope to remedy the mistakes here of wobbly edges!

I used the same fabric for lining the crochet piece and sewed them together with some of the crochet overlapping the lining on the inside.

Again, I threaded the now lined crochet piece through the handle and hand sewed it down using a navy thread so the stitches cannot be seen.
This done, I could then hand sew the crewel piece to the crochet piece, right sides facing, ensuring to leave a good 2" gap at the top of each side to get in and out of the bag itself.

And here is the finished product! One side crochet and the other side Crewel. As sample pieces of crewel, there are no two bits alike and well- my crochet is never the same twice so this really is a unique bag. I think it makes a perfect knitting/ crochet bag as it's thick and sturdy with lots of rooms for wool, needled and a magazine/ pattern. A new addition to my craft stall on Good Friday-yes I know I said the last one would be the final one before baby comes, but this was too good to refuse!

Here are a few of the other pieces I have made combining crochet and crewel work.
This was a very small sample piece but ideal for a little purse. I lined it with a rough cotton and found half a ball of chunky wool. Using a large crochet hook, I did a small knit piece of treble stitch and then added a chunky zip to finish.


Lastly is a cream crewel piece with a chunky cream crochet side. I also did a little crochet shoulder cushion for extra detail. This is finished with a magnetic clasp and also lined with a thick cream cotton. The crewel piece is worked on a rough canvas which makes an interesting combination with the soft wool. I love this piece but could never keep it clean personally!


Wk 8- Hen Goodies
Next week is a good friend's hen do. It's a daytime and night-time event and I have committed to making goody bags for all those who come to the daytime part and there will be other crafty things going on like cupcake decorating and jar conversions. The bride-to-be loves pink and so there will be a pink theme so I have looked through my fabric stash and found this material. Obviously I need quite a lot as there could be 30+ there!


I made 15 bags in the end as only 12 guests have confirmed they are coming. The other aspect of the crafty bit was the jar decorating so I had a go at some myself as an example piece. Using the colour scheme from the bags, I chose blue and pink with a white doilie for the collar.

Sticking quite closely to the design on the bags, I cut out 2 flowers in bright pink and then one in baby pink. Using stickytape rolled over, i attached them to the jar. I think spray adhesive would also work but it may depend on how long you had a candle burning insode as to how long the glue would hold under the heat.


Wk 7- handbag charm
I have been wanting to create some handbag charms for a little while and had bought the key rings to do them but they have sat in a box for 6 months or more :s With creating handbags and totes, i thought a little keyring would help to individualise them. I posted at the beginning of this challenge an image in a book of some folk art and this was my inspiration for the piece.

I did my own pattern but used some of the shapes in the images above and the main design relies on repetition. Since my camera was dead, I took pictures on my phone but I don't know how to upload them! I'm useless at the moment- sorry! My ankle is lots better now but has slowed me down even more than my usual 7 month pregnancy pace!) I used a cup to draw around to get the circle and then drew a few designs on a piece of paper. Once I was happy with one of them, i traced it onto some thin white cotton in black biro. I chose basic primary coloured cotton thread (and a grassy green) from Ikea as I felt they had a traditional folky brightness. Using a series of satin stitch and French knots, I filled in the pattern. I don't have an embroidery hoop, so it was slow going! I carefully cut around the outside of the circular design using pinking shears leaving a 5mm seam allowance to turn under.
I chose some blue felt for the backing and a stretchy primrose yellow frill edging. I also had a short piece of a 1cm primrose velvet ribbon to hang the embroidered medallion to the keyring.

I then used the yellow rim to edge the medallion whilst turning under the white seam allowance. This was quite time consuming also in trying to keep it neat and flat. Once finished, I cut out a circle of blue felt using the same cup for the template.and then used very small stitches in blue thread to attach the embroidered piece to the felt.

I left a gap at the top to insert the primrose velvet ribbon and then looped it through the keyring and sewed in place.

And here it is. I wished I had left a longer section of the velvet ribbon but this way it can be a keyring or a handbag charm. For the size of it, you wouldn't know it took me close to 4 hours to make, although that's more to my slow embroidery than anything else I think!
Wk 6- Scarf bags
The title may be a little misleading as I did use more than a scarf for these bags but they were all made with one scarf as their inspiration and each have parts of it's paisley design appliquéd onto them.


 The back...
 The front:

With some of the left over border and a little burgundy, I also made a little purse. Initially it was going to be a pouch on the inside of a bag but I decided to keep it separate.


I will sew a press stud into it to help keep it closed at the top of the inside. The border here is an additional flap so it would be quite secure in any of the bags. I have been toying with whether to attach a key chain to it though to hang inside the bag.
The most ambitious bag I attempted was a messenger bag with waterproof lining. I know from a couple of patterns I looked at that this style can be made with one continuous piece but I decided to cut them up as I felt it would be easier for me- perhaps more time consuming but neater in the end. I then cut out lining pieces for each of them.


I made the strap using a piece of the waterproof lining encased in a wider strip of the mustard patterned fabric. This makes quite a sturdy strap which I reinforced at the sides with backstitching.


I decided to use the muted paisley lining again since I have quite a lot of it but also because it seems to tie all the colours together in a softer, muted palette which will hopefully appeal to a wider market! I started with the appliqué to the front piece and then sewed the lining along the top right side to right side) so that when I folded it over, the stitching was all concealed. Next I sewed the front piece, with the lining to the bottom piece with it's lining inside out. Then the sides and lastly, the back. I didn't think it looked finished and so have since added a blue strip around the top edge. It is the same pattern as the burgundy material but in blue. The beauty of the paisley is that it has so many colours that It was easy to find material in the correct shade.


I have yet to add the handles to this last bag but the strips are sitting waiting to be sewed on. If you haven't already guessed, handles are my least favourite part as they are so faffy! But Oh so necessary for a bag! With my right ankle being the one that is twisted, I am somewhat hindered in being able to sew using the machine for a few days. The fair is next Saturday though, so I need to make a quick recovery :s
Wk 5- Little Girl Dress
I said in my first post that I wanted this creating something new each week to be a challenge both to do more each week but also to stretch myself. This has definitely been a difficult project but I am all the more pleased for my accomplishment. I saw this dress (yes- on Pinterest!) and thought 'I could do that!' and figured this would be a good week to try.
http://media-cache-ec1.pinterest.com/550/91/1b/a9/911ba9afad93e9d8500a1997561a150b.jpg
I have made dresses for my little girls before but not lined or with sleeves.

I used a dress of my 4 year old's as a template and cut out 2 pieces (front and back) on the patterned material and then 2 more on plain white cotton (for the lining).

I pressed all the edges down using the adhesive tape to help with sewing the layers together and to create a crisp hem.

I wanted to have a little white collar on the front and felt the zip would need to be reinforced and that a white border on the back would add some detail. I cut these out and also pressed them with the iron onto the right side of the material using adhesive tape. Then I put the four pieces together (back lining, back right side, front right side and then front lining) and sewed up the sides, leaving the arm holes and shoulders free until I sewed on the sleeves.
Next a cut a long strip of the patterned material and pressed the sides down before sewing a running stitch up both sides on the machine.

Pulling both top strings together, I created a ruffle with the strip and then cut it in two. Fixing the two pieces onto the dress below the collar with pins, I then sewed them down with the machine.

Next I attached the zip although it looked quite messy so I knew I would have to neaten it up somehow but I decided to come back to that once I had done the rest.

I used a side plate to draw around the edge for the sleeves in the white cotton and left a 1cm seam allowance before cutting out 2 semi circles. I sewed around the rough edges and then pinned them to the dress with some pleats at the top of the shoulder to create a little 'puff, capped sleeve'.

When I was happy witht hem, I turned the dress inside out and sewed the sleeves in place, very slowly!

The dress looked pretty but there were rough edges that I felt I needed to fix somehow so went to my ribbons for inspiration.

This ribbon was the perfect colour to match the zip and helped make the dress look less like a school pinafore and more like a normal everyday dress. This ribbon continued around to the front of the dress to create an empire line which finished at the half ruffle.

The last job was to sew little buttons onto the ruffled section at the front, and hey presto .. several hours later, a dress for my 4 year old. The plan was to make one for the 2 year old too but it was very time consuming so may have to wait a couple of weeks!


Wk 4
Quite a difference from last week where I had 3 projects on the go, to this week where I have rushed this piece and it still isn't quite finished :s It has been very busy though and although I would have liked to have spent more time on this, I am really pleased with how it turned out and hope to make some more. My inspiration for this came from pinterst, although, me being me, i couldn't just do a straight copy!

I have had this beautiful broderie anglais for quite a while now and used it sparingly as I didn't want to 'waste it' but this seemed like a perfect use.

I looked through my material stash and found some pillow cases which were in co-ordinating fabrics. (I shall take a moment to appreciate pillowcases- I often pick them up for 99p or less in charity shops and many are hardly used. They're often in pairs- or if you're lucky 4 and as smaller items, they may have a block pattern that lends itself to soooo many things- from the apron last week to pillow case dresses for little girls, or most commonly for me, tote bags. I can cut off borders and re-sew them on for a patchwork effect with the original material creating a perfect colour match with them thrown together feel. Appreciation talk over)

I selected the two on the right with a small piece of plain white and cut out strips 1.5 x the desired finished length. For more ruffles, add extra length and just gather the material more, but since I knew this was going to be a tote, I didn't want it to be too heavy and I am lazy and didn't want to have to change needles and feet on my sewing machine, so I didn't want heavy ruffles.

I sewed them together first right sides together one at a time until I was left with a large patchwork rectangle. I then sewed a running stitch on the machine up the centre piece and then 2 more on each of the broderie anglais pieces. I pulled the strings at the end gently gathering the pieces but not all together as I wanted them to look bumpy rather than perfect uniform pleats.

Placing the gathered piece onto the backing material chosen (one of the pillow cases) it was the right size and so I then sewed a piece of thin lace through the middle and onto the right side of the backing. I also sewed down the two brown sections leaving the outer ruffles loose. To neaten the section where the ruffles are sewn onto the tote, I attached a piece of ivory satin ribbon. I did a zig zag stitch at the bottom as it was uneven but a straight stitch at the top.

Taking the back piece with the front ruffled piece, right sides facing, I sewed up three sides leaving 1.5'' at top of each side. This was just so I could sew down the ragged edge and then fold over again. When ironed and hemmed, it makes for a stronger bag too. I trimmed the excess at the bottom on the inside and then turned it right side out.

This is the finished (so far result). I need to add handles and perhaps a couple of buttons/gathered flowers but you get the idea. Like I said- more of these bags to come! Although making a a bag isn't a new challenge, I haven't done ruffles like this before so I am pleased. I have a craft fair in a few weeks so may do a few for that in addition to quilts-will add pics once finished!
Wk 3
I have to start by admitting that I have started 3 projects this week and ended up putting the first 2 to one side :s the first was a round crochet cushion and although the front circle was fine, I was struggling with the easiest part- the long knitted piece for the edge. It was taking a long time and wasn't straight so unfortunately I will have to unravel it and start again. Good job baby not due until May eh? I thought I'd do a piece of folk embroidery and spent two nights on that but after finishing, I didn't know where to go from there! (I have since had an idea so may do that for next week's project.) So last night, I decided to start afresh,and with Aprons on the brain, I decided to transform an old pillow case into an apron.

I had picked up these 2 pillowcases from a charity shop for 99p and hoped to transfrom them into dresses for my little girls but then had second thought about the pattern for them. (I think I will make little skirts for them instead).

At the opening of the pillow case, there is one side longer than the other for an envelope close. This extra section added and extra 3'' to the length and the spots are a pretty bottom. Once I had cut up both sides on the pillow case, I had a large rectangle and with the extra spotty section at the bottom, I cut away to sections around where the torso section would be.

As mentioned in previous posts, I am not very precise with cutting etc. I have learned that pressing seams with an iron before sewing makes life lots easier!

I actually also used hemming tape for this all the way around so as to give a crisp edge.

Before attaching the neck and waist straps, I wanted to add a little 'something' first and found this chunky red ric rac in my ribbon stash which seemed appropriate and I had just enough left. I added some to the top and bottom but also an extra one through the bottom spotty section. I toyed with added a large pocket but decided against it as I couldn't find an aesthetically pleasing place to put it!

I chose a wide red webbing for the neck strap and it also has a small frill detail making this a pretty addition which was the same shade as the ric rac. However, I didn't have enough for the waist and so used navy for the waist. It isn't as pretty, but it will go towards the back and tones in with the rest.
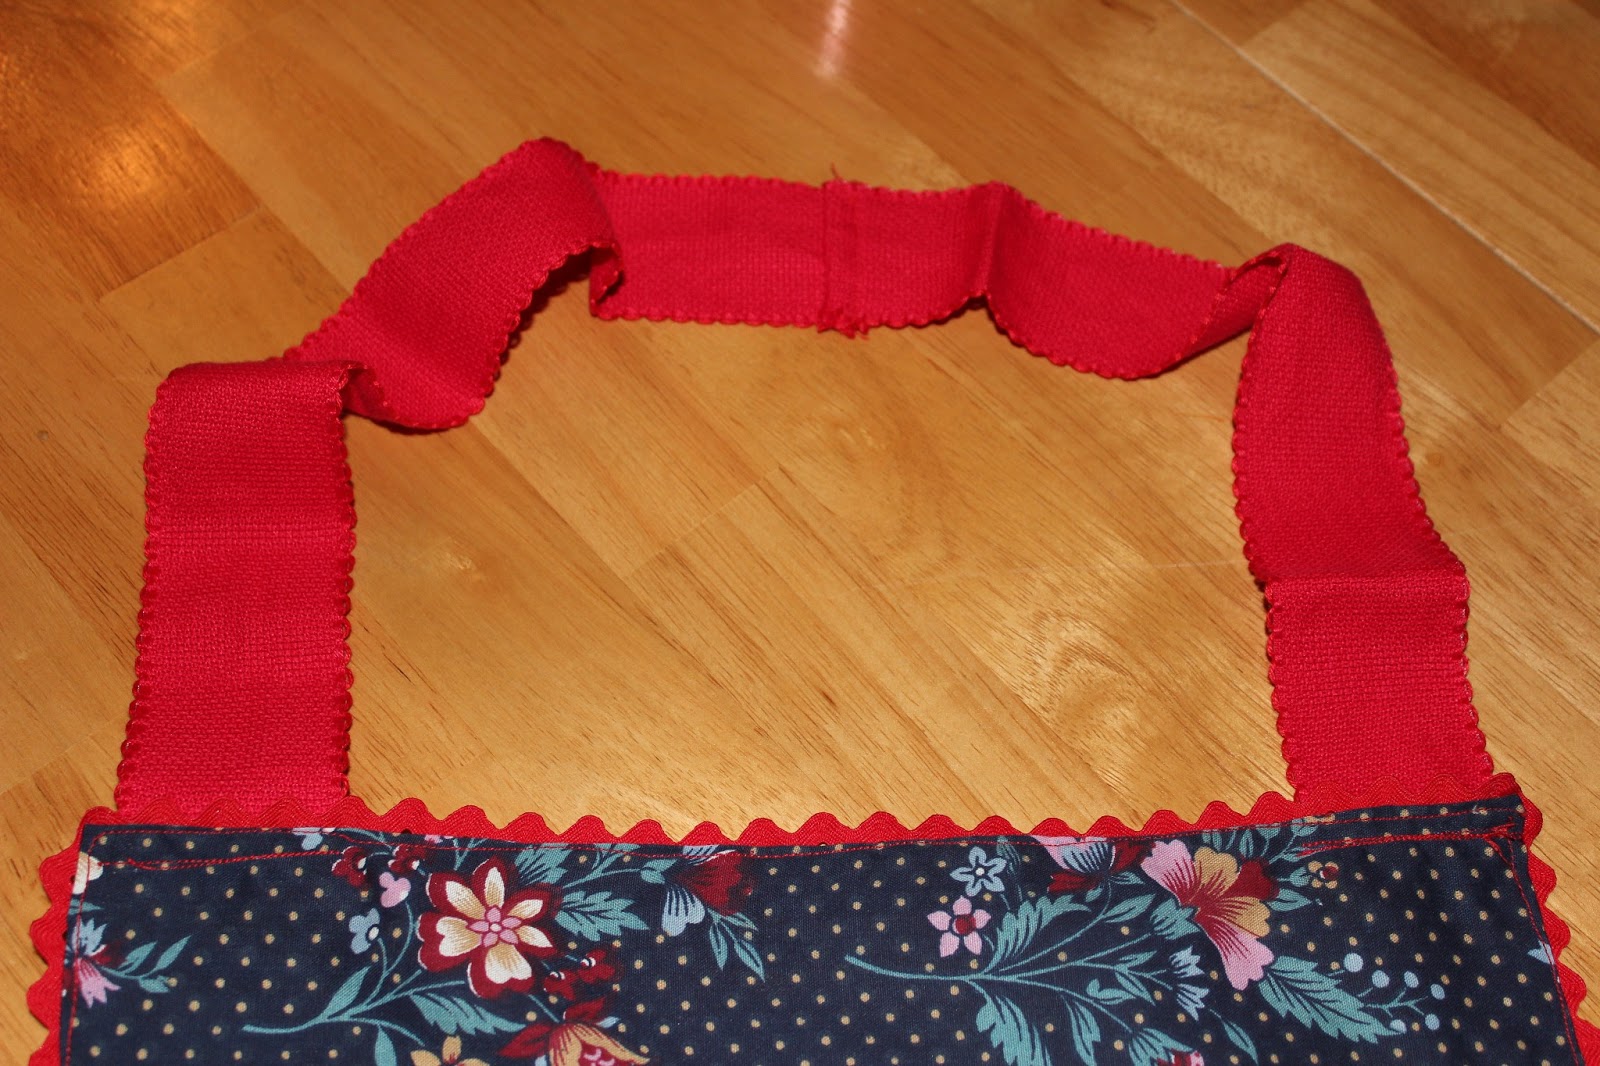
Here is the finished product. I have booked a stall for a craft fair at the end of Feb- the last one before baby comes I think- but it is in time for Mother's day so I may add this to the items for sale as I don't have a desperate need for more aprons! I have enjoyed up-cycling the pillow case into something useful and potentially a gift and still have another full pillow case and the back of this one to play with!

Wk 2
After looking over the first post, I realise it was very long and wordy- I apologise and will try to be more succinct this time (and also in the future!)
I have seen the idea of potato printing a few times recently (Kirstie Alsopp's vintage home) and also fabric printing which I decided to link together and to potato printing using fabric paints onto fabric. Having never done this before I looked to a few of my books for 'how to' and tips and Lo and Behold found a book from the 70's which covered this very practice :D
I realise I am writing lots again. oops. Chose potato's. Used metal bottle top to get a crisp circle and cut away the excess potato. I tested it out first on a scrap peice of material to see how many stamps I got before having to re-dunk.


I felt I had the hang of it and so began on my other piece of white material- just an old sheet thrifted. I left them to dry overnight while I mulled on what on earth to do with them!
The next day I decided to use them in a mixed media collage which would be a page in a fabric journal/ scrapbook. I have been wanting to have a go at scrap-booking but with material and hadn't realised how amazing and popular it was until Pinterest! Ahhh pinterest *sigh*
So, I took it to the machine and began turning the blobs into abstract flowers by sewing around the edges.

After doing this I realised I'd seen very similar things before so decided to try and individualise it a little more but didn't know how so looked to buttons, ribbons and fabrics for inspiration.


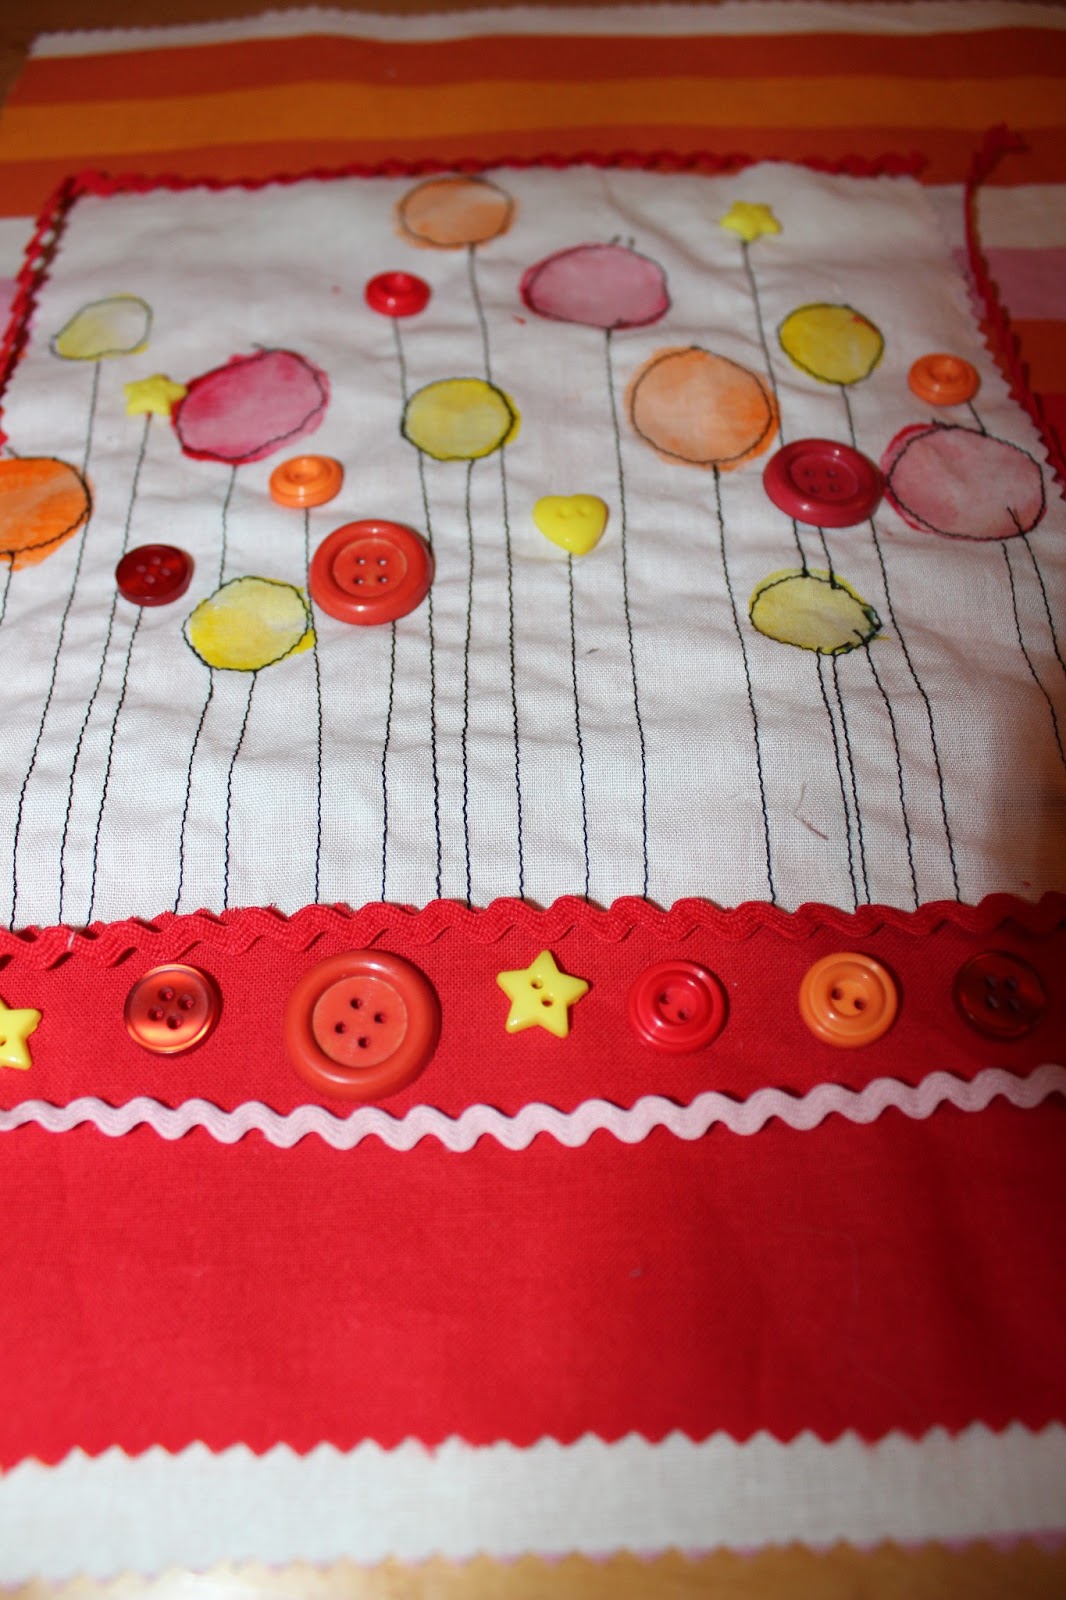
After playing around with a few different designs, I decided to add extra button flowers so marked where I wanted them and sewed their stems. I also decided to use ric rac to line the edges and add a partial button border all against a stripey background. After sewing them in place I was happy with the result and think they will be a page in my first fabric journal.

Despite not creating a fully finished item, it did take several nights and I have begun the second page using the same potato printing only next time I will use different materials to embellish. Here's what I've got so far:


But I will do something else for my item this week and come back to this next page on another occasion.
Wk 1
Portable woodland play mat with characters.


I wrote in my previous post (on the main page) about how I came to do this idea but here is how I did it. I had initially thought about making a tote bag which fastened by Velcro down the side and bottom with the picture on the inside so that when it opened out it was a play mat. As I began making it, I decided that a separate smaller bag would be more practical for chucking into a changing bag or handbag and so made a fold-able mat instead with a separate bag big enough to include the little extras. we see squirrels most days so I knew I wanted to do a squirrel and the Mollie Makes inspiration for a hedgehog was too hard to resist. So I went to my fabric stash and picked out autumnal colours which co-ordinated together.


The first choice was an old pain of trousers which didn't fit me pre-pregnancy and I felt it unlikely they would fit again (besides, they were always a little too short for my liking). The next pieces were in a mustard tone which was accented in the trousers and once I had them all together, I was away!


I cut strips of zig zags out of the trousers for the hedgehog spikes and used a plain peach coloured sheet for his face and belly. I sewed the strips of brown to the peach material and then stuffed him with toy stuffing. I deliberately chose to hand sew him as I liked the messy finish with the black thread to add to his spikes. I decided to do the same with the squirrel and leaves. The squirrel was made using an old pillow case and the same peach sheet. One leaf is from liberty material I bought in a selection from Ebay and the other is also a pillow case. I liked the idea of different shaped leaves and hope to make a few more (with some toadstools in the future).
The next part of the process was to make my scenery. Turning the material onto the wrong side, I drew the shape of trees and cut them out carefully as the 'wastage' was going to be reused in the other side to create a relief/ silhouette. The trousers were again used here with another material I love in a mustartdy colour.

 It took a very long time to hand sew this on! I doubted I would be able to sew it on the machine straight enough and without puckering it. After I had hand sewed it on, I went around the edges with the machine too.
I had a piece of this wipeable mustard material which came with a 50p bundle of other bits in Aberkhans (In Liverpool.- I tend to get most fabric from here as they have a great selection for a good price). I sewed the wrong side of the finished scene to this sheet, leaving a gap to turn inside out and then hand sewed the hole closed.
I also sewed magnetic strips into one side of the tree and also into a leaf and the hedgehog.


I discovered quickly that the magnets weren't very strong and didn't work as well as I had hoped but well enough for the hedgehog to stand up.
Finally, I had to make the little bag for them to go in (which was the easiest part. I took one strip of material and sewed the zip to the top on the machine. Then, opening the zip, I was able to sew up the sides on the wrong side and turn it back to the right side through the opened zip.


You will probably notice that I don't mention measurements etc and that's because I don't really do measuring :s At least not for this type of thing. I tend to go by 'eye' and figure it out as I go. On this occasion it worked okay but that isn't always the case!
No comments:
Post a Comment